Blue Bottle Pour Over Guide: Ratios, Timing, and Technique
You want that clean, balanced pour over you tasted at Blue Bottle. The one that made you realize coffee could taste completely different from what you brew at home. But recreating it seems complicated. Four separate pours at exact intervals. Precise water amounts. Specific spiral patterns. Miss one detail and you end up with something weak or bitter.
Blue Bottle built their reputation on consistency. Their baristas follow a structured method with measured ratios and timed pours. The good news is you can use the same technique at home with basic equipment.
This guide breaks down Blue Bottle’s pour over method into clear steps. You’ll learn their exact coffee to water ratios, the timing for each of four pours, and how to troubleshoot when something tastes off. Whether you’re brewing their beans or using your favorite coffee, these techniques will help you pull more flavor from every cup.
What you need for the Blue Bottle method
You don’t need expensive equipment to follow this blue bottle pour over guide. Blue Bottle uses simple, accessible tools that most coffee shops carry, and you can find the complete setup online for under $100 total. The key is precision, not price.
Essential brewing tools
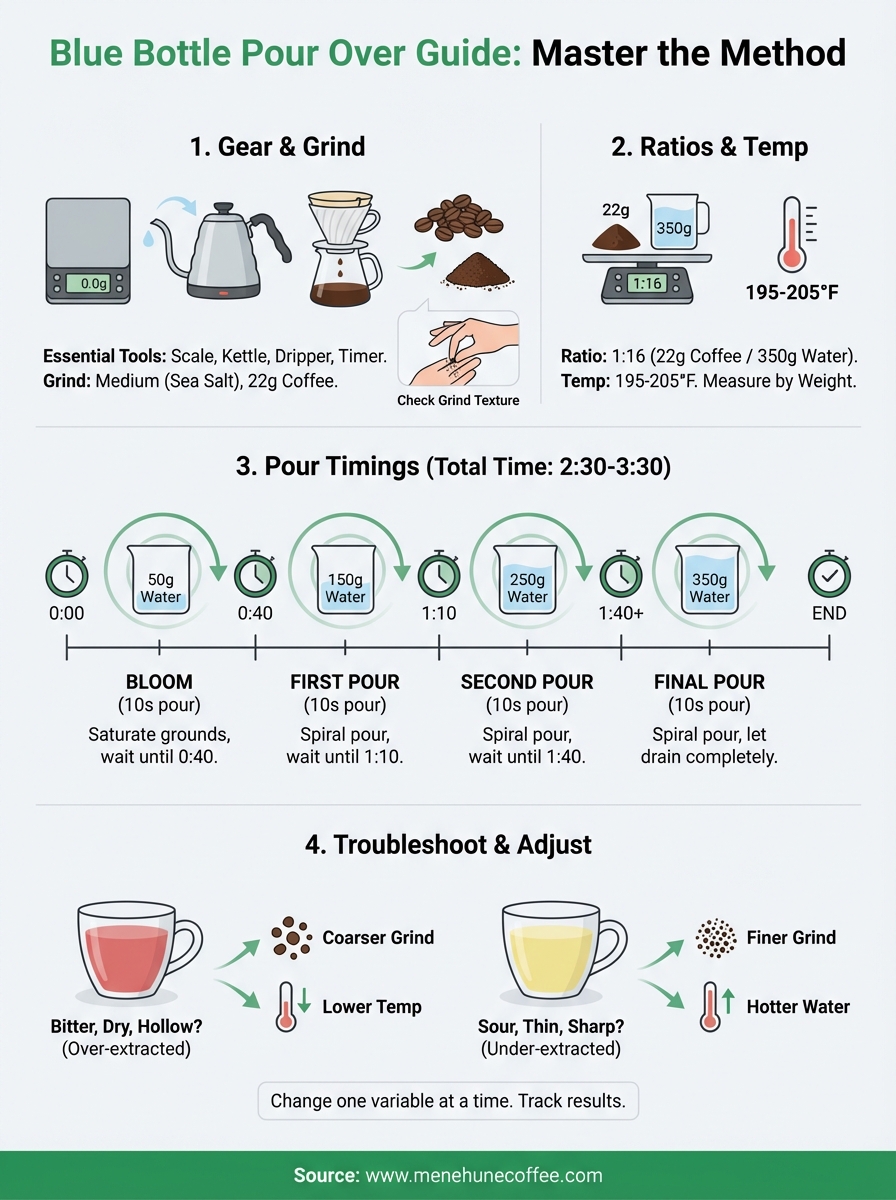
Your basic setup includes these six items: a V60 dripper (size 02) or Blue Bottle’s own cone dripper, paper filters that fit your dripper, a digital scale accurate to 0.1 grams, a gooseneck kettle for controlled pouring, a timer, and a carafe or mug to catch the coffee.
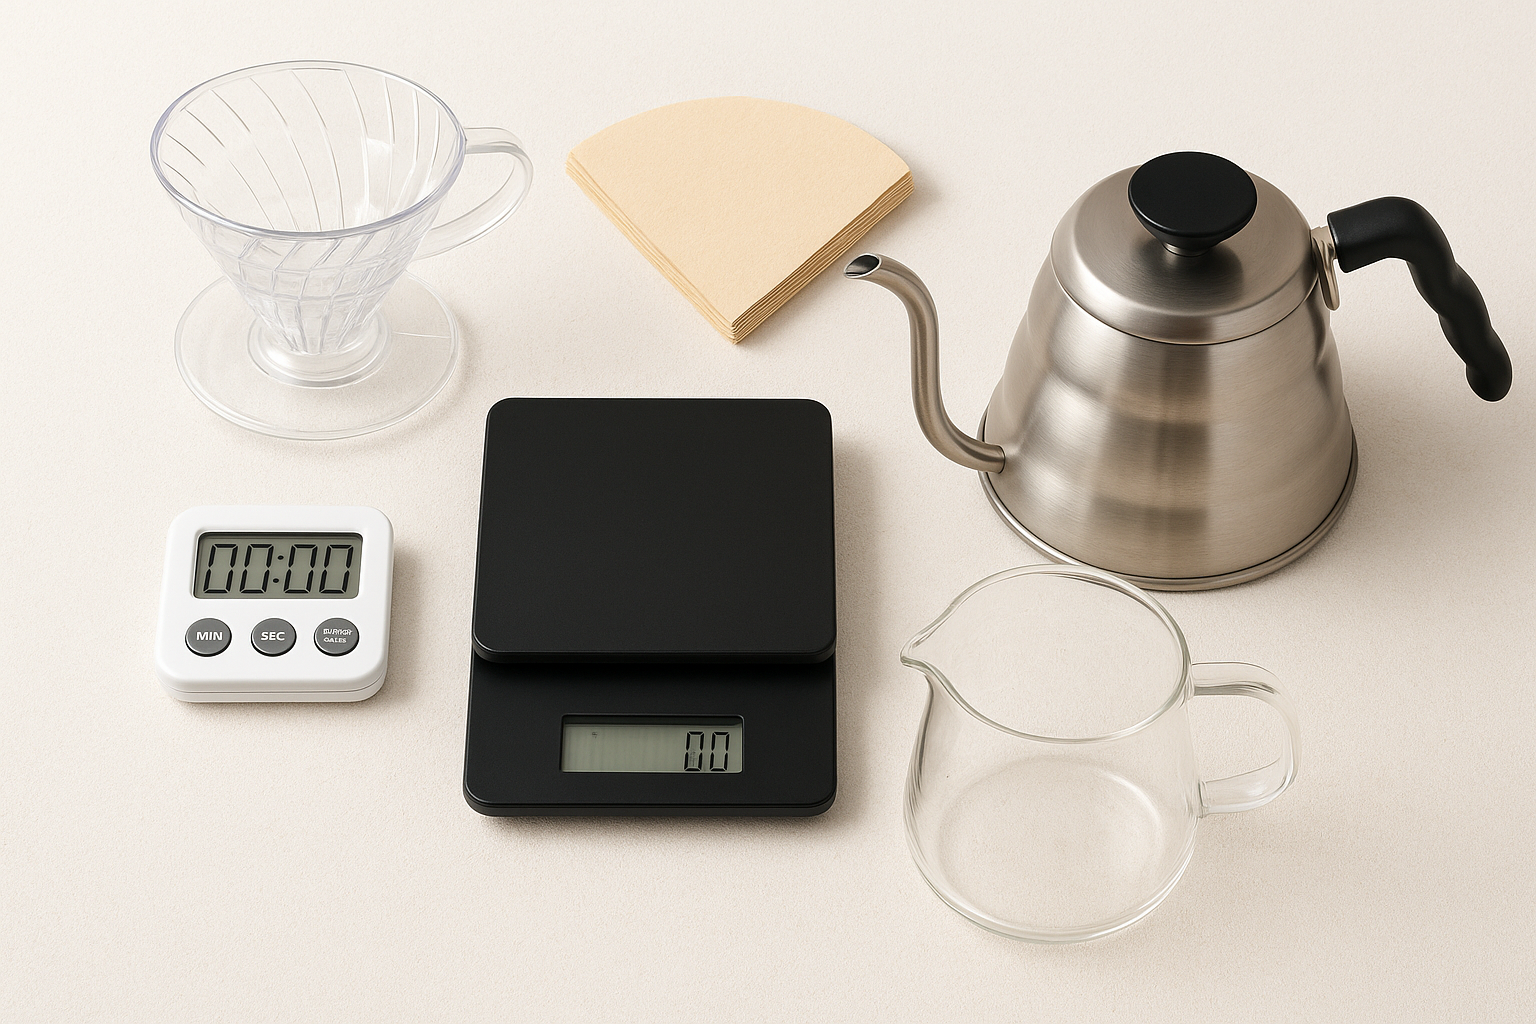
The scale matters most. Blue Bottle measures water by weight, not volume, because 350 grams of water pours more consistently than trying to eyeball measurements. A gooseneck kettle gives you the steady, spiral pour pattern their method requires. Without these two tools, you’ll struggle to replicate their timing and extraction.
The ritual of the pour over is like a meditation: There’s no machine in your way, no flashing green lights, no electric power cords.
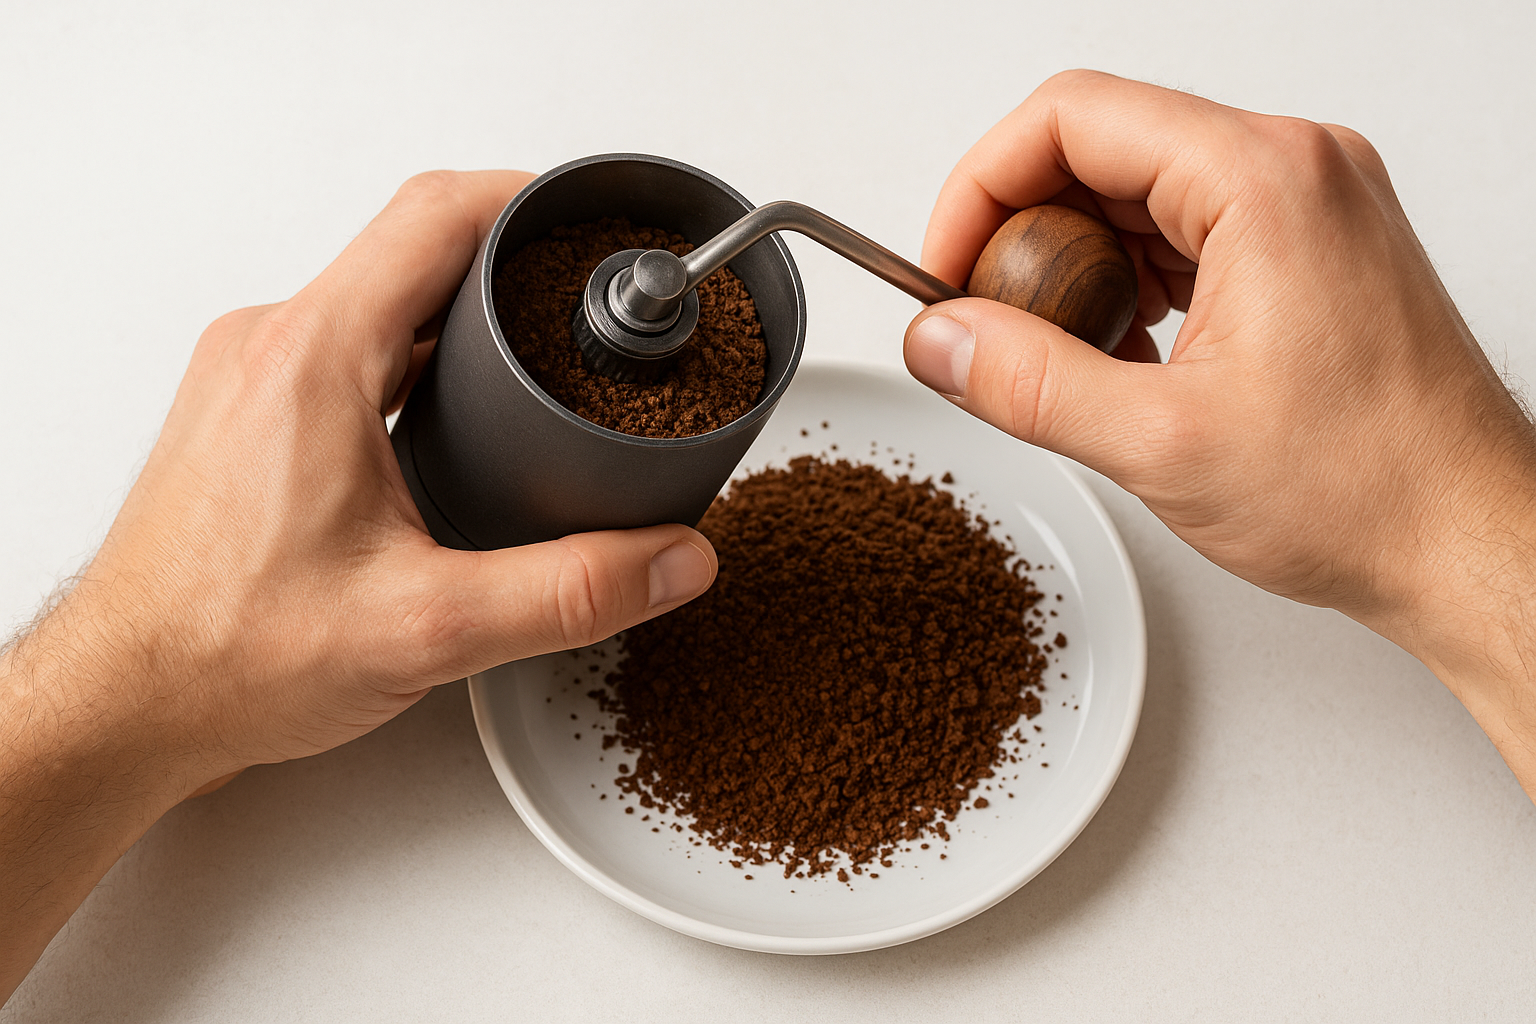
Step 1. Choose and grind your coffee
Your coffee choice affects everything that follows in this blue bottle pour over guide. Blue Bottle recommends 20 to 27 grams of whole beans for a single serving, depending on how strong you want your cup. Start with 22 grams if you’re testing their method for the first time. This amount gives you enough coffee to extract balanced flavors without overwhelming the water.
Coffee selection
You need freshly roasted beans from the past two to four weeks for best results. Older coffee loses the aromatics and oils that create complexity in your cup. Blue Bottle uses lighter roasts for their method because the longer brew time extracts delicate fruit and floral notes. Darker roasts work too, but you’ll want to drop your water temperature by five degrees to avoid extracting bitter compounds.
Grind settings
Grind your beans to a medium coarseness that resembles sea salt. Too fine and your brew time extends past four minutes, pulling harsh flavors. Too coarse and water rushes through in under two minutes, leaving you with weak, sour coffee. Blue Bottle grinds fresh immediately before brewing to preserve volatile aromatics that disappear within 15 minutes of grinding.
Grind your coffee to a coarseness resembling sea salt.
Test your grind by rubbing grounds between your fingers. You should feel distinct granules, not powder or large chunks.
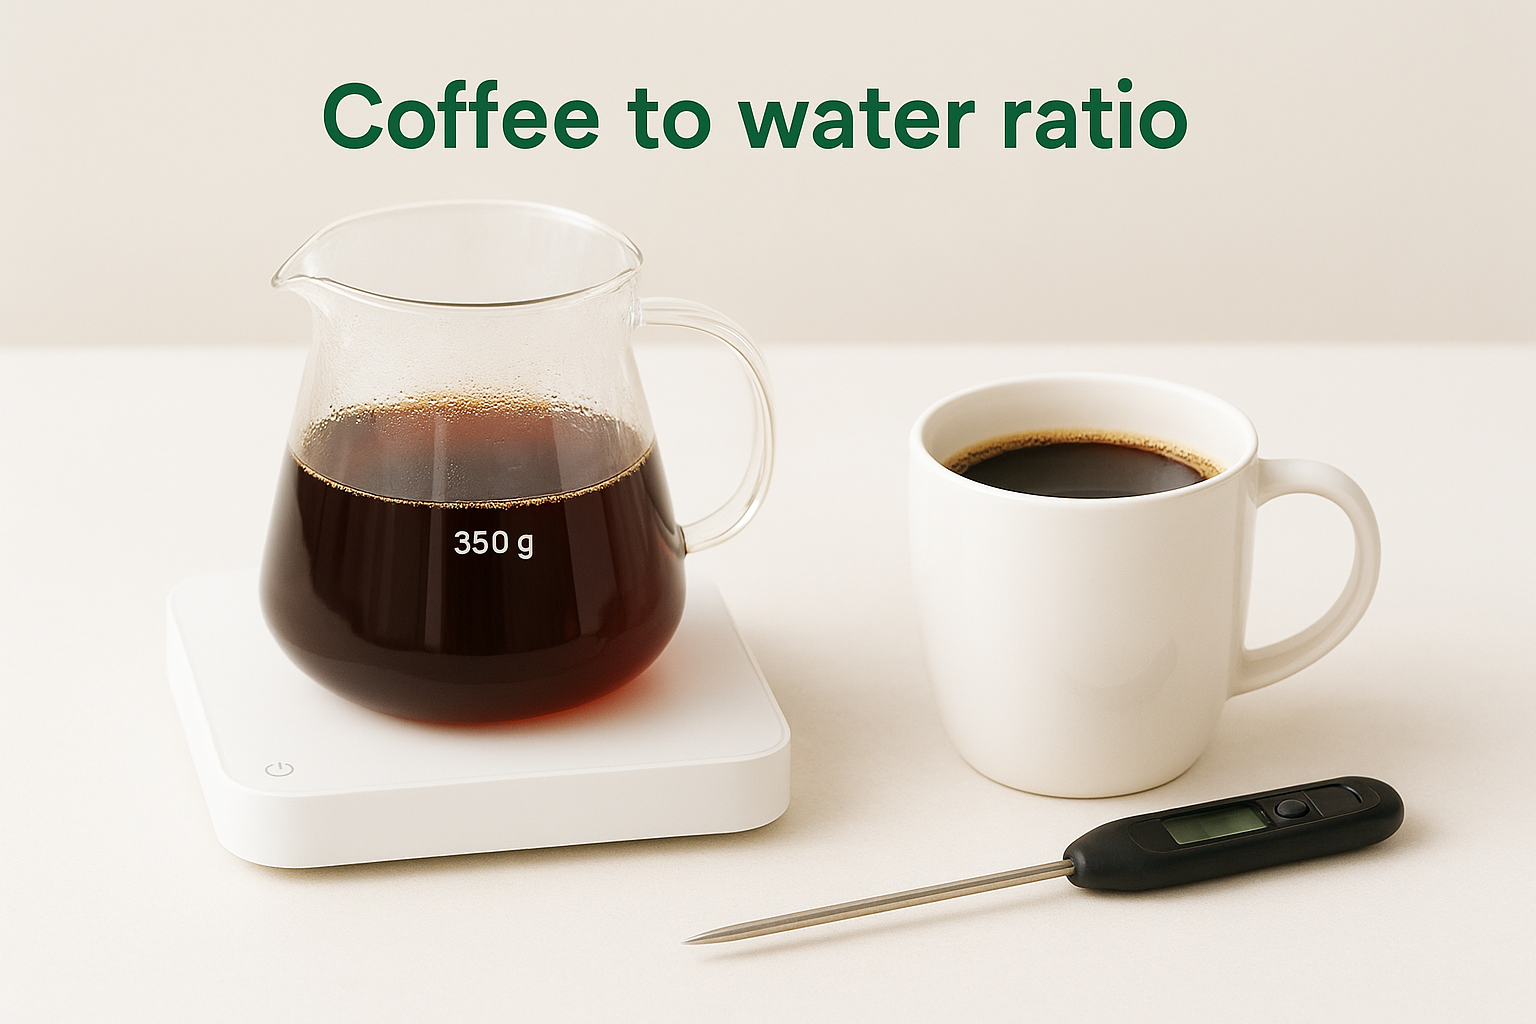
Step 2. Set your ratios and water temperature
Blue Bottle’s method relies on precise measurements to extract coffee consistently every time. You measure everything by weight, not volume, because a tablespoon of coffee grounds varies dramatically depending on grind size and roast level. This step in the blue bottle pour over guide establishes the foundation for the timed pours that follow.
Coffee to water ratio
You’ll use a 1:16 ratio of coffee to water for balanced extraction. Blue Bottle standardizes this as 22 grams of coffee to 350 grams of water, which produces roughly 12 ounces of finished coffee. Scale both numbers proportionally if you want a different serving size. For example, 27 grams of coffee needs 432 grams of water to maintain the same strength.
| Coffee Amount | Water Amount | Final Yield |
|---|---|---|
| 20 g | 320 g | 10.5 oz |
| 22 g | 350 g | 12 oz |
| 27 g | 432 g | 14.5 oz |
The ratio affects your brew’s strength and body. Stronger coffee comes from a 1:15 ratio, while a lighter cup uses 1:17. Stay within this range or you’ll extract bitter compounds or weak, sour notes.
Water temperature
Heat your water to 195 to 205°F before you start brewing. Blue Bottle recommends lower temperatures for darker roasts (195 to 198°F) because they extract faster and can turn bitter. Lighter roasts need hotter water (202 to 205°F) to pull out fruit and floral notes.
Darker roasts brew best at the cooler side of the spectrum, while lighter roasts take hotter water.
Use a thermometer or an electric kettle with temperature control. Water that’s too hot scalds the coffee and creates harsh flavors. Water below 195°F won’t extract enough oils and sugars, leaving you with flat, underdeveloped taste.
Step 3. Follow the Blue Bottle pour timings
This step in the blue bottle pour over guide requires four separate pours at specific intervals. Each pour follows a spiral pattern that starts in the center of the coffee bed and moves outward to the filter’s edge, then spirals back to the center. You’ll finish each pour within 10 to 20 seconds, then wait while the water drains before starting the next one. The complete brew takes 2:30 to 3:30 minutes depending on your grind size and coffee choice.
The bloom (0:00 to 0:40)
Place your dripper on the scale, add your grounds, and tap gently to level them. Start your timer and pour 50 grams of water in a spiral pattern, making sure you saturate all the grounds. You want to complete this bloom pour in 10 seconds. The coffee will bubble and expand as trapped carbon dioxide escapes. Wait until 0:40 on your timer before continuing to the next pour.
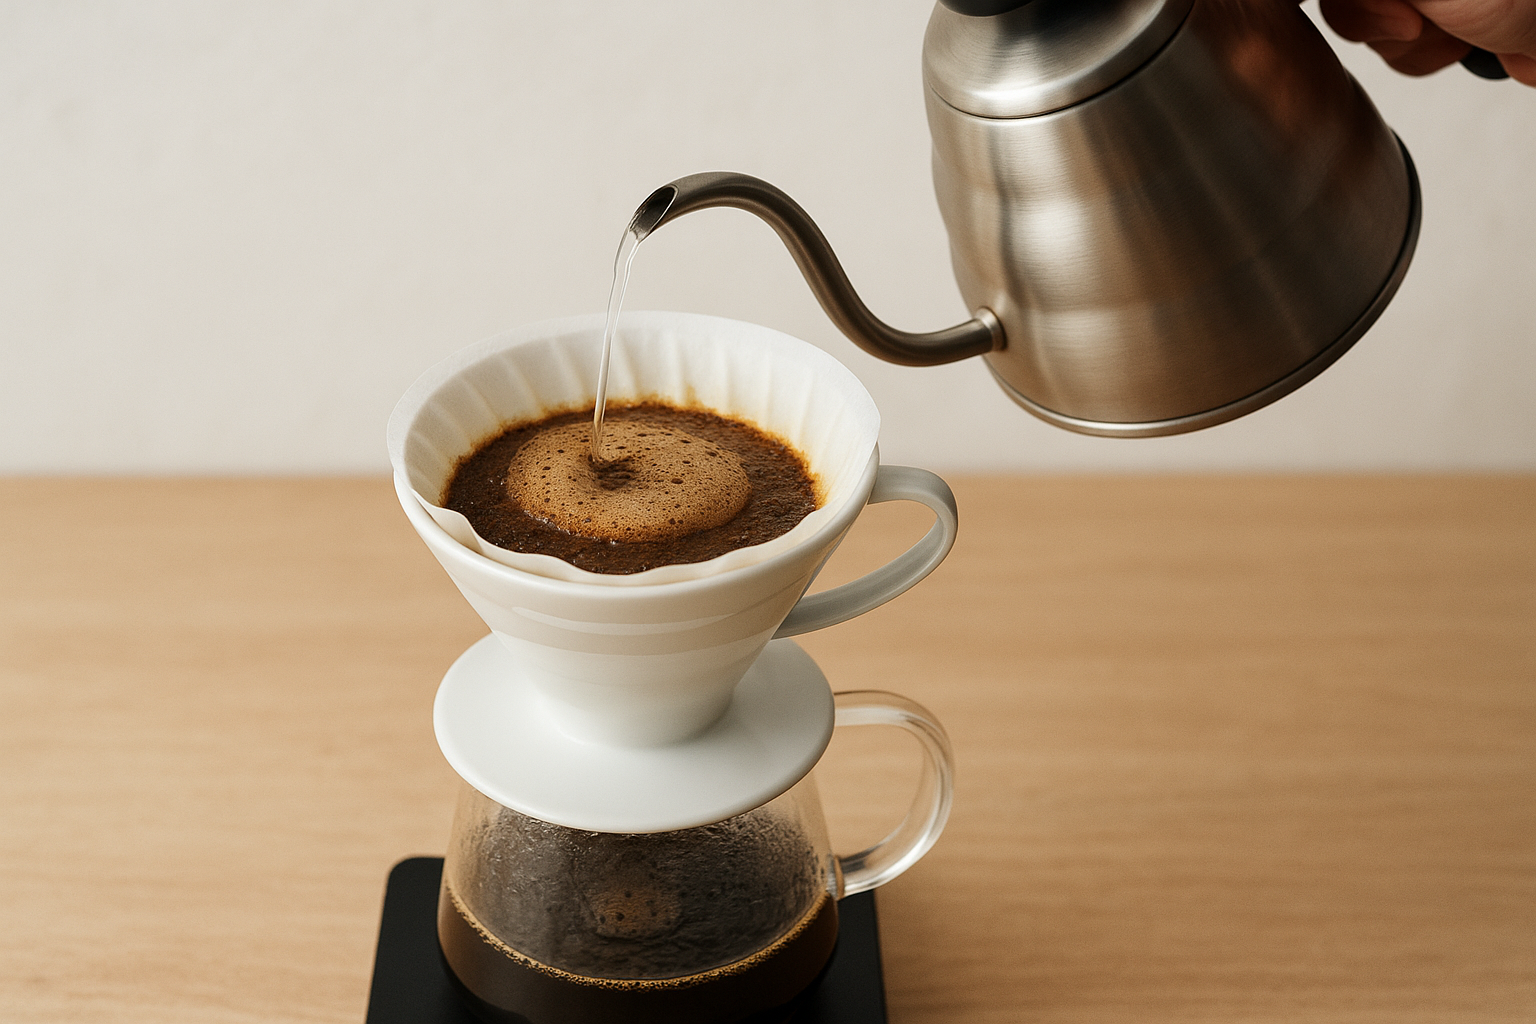
You’re aiming to finish this pour in 10 seconds.
First through final pours (0:40 to 1:50)
Your remaining three pours follow the same spiral technique with increasing water amounts. Each pour sinks the floating grounds and creates gentle turbulence that extracts flavor evenly.
| Pour | Start Time | End Weight | Duration |
|---|---|---|---|
| Bloom | 0:00 | 50 g | 10 sec |
| First | 0:40 | 150 g | 10 sec |
| Second | 1:10 | 250 g | 10 sec |
| Final | 1:40 | 350 g | 10 sec |
After your final pour, let the remaining water drain completely through the grounds. Your brew finishes when the coffee bed stops dripping, typically between 2:30 and 3:30 total time.
Step 4. Taste, troubleshoot, and adjust
Your first cup using this blue bottle pour over guide probably won’t match Blue Bottle’s cafe exactly. You need to taste critically and adjust one variable at a time until you find what works for your beans, grinder, and water. Pour your finished coffee into a clean mug, let it cool for two to three minutes, then take small sips from different parts of your tongue to identify flavors.
Fix common brewing problems
Most issues trace back to extraction level, which you control through grind size and timing. If your coffee tastes off, change only one element before brewing again so you know what caused the difference.
| Problem | Taste | Solution |
|---|---|---|
| Over-extracted | Bitter, dry, hollow | Coarser grind or lower temp |
| Under-extracted | Sour, thin, sharp | Finer grind or hotter water |
| Weak body | Watery, flavorless | Add 2g coffee or reduce water |
| Too strong | Overpowering, muddy | Reduce coffee by 2g |
After reading your content, will someone leave feeling they’ve learned enough about a topic to help achieve their goal?
Track your adjustments in a notebook. Write down your grind setting, total brew time, and tasting notes each session until you dial in consistent results.
Enjoy cafe quality coffee at home
You now have the complete blue bottle pour over guide that Blue Bottle’s baristas follow every shift. The method works because you control every variable through measurement and timing. Your scale ensures consistent ratios, your timer keeps pours on schedule, and your grinder produces the particle size that extracts balanced flavor from any bean.
Practice this technique with different coffees to discover how origin and roast level affect your final cup. Light roasts from Hawaii reveal bright fruit notes that darker roasts hide completely. If you want to experience how specialty beans transform this method, try authentic Hawaiian Kona coffee grown on volcanic slopes at Menehune Coffee Company. The right beans combined with precise pour over technique create the cafe experience you’re chasing at home.