What Is Pour Over Coffee? Gear, Ratios, Steps, Vs. Drip
You walk into a coffee shop and see the barista slowly pouring hot water over grounds in a cone-shaped filter. The coffee drips into a single cup. It takes a few minutes and costs more than regular drip coffee. You wonder if pour over coffee is worth the extra time and money, or if it’s just another coffee trend that doesn’t live up to the hype.
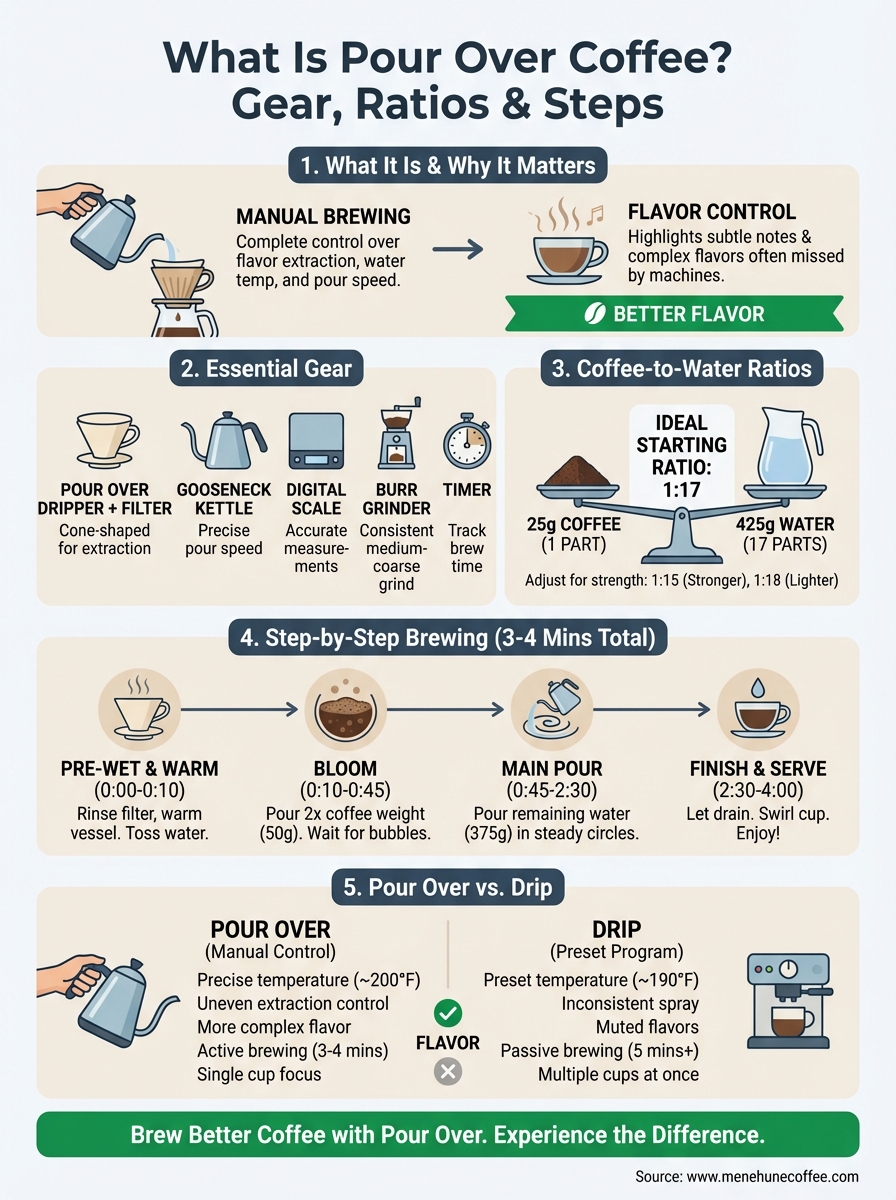
Pour over brewing gives you complete control over your coffee’s flavor. Unlike automatic drip machines that heat water to whatever temperature they want and pour it however they’re programmed, you decide the water temperature, pour speed, and brewing time. This hands-on approach pulls out flavors you didn’t know your beans had.
This guide walks you through everything you need to know about pour over coffee. You’ll learn what makes it different, which gear you actually need, the right coffee-to-water ratios, and step-by-step brewing instructions. We’ll also show you how pour over stacks up against drip coffee so you can decide which method fits your morning routine.
What pour over coffee is and why it matters
Pour over coffee is a manual brewing method where you pour hot water over coffee grounds in a filter-lined cone or dripper. The water passes through the grounds and extracts flavor before dripping into your cup or carafe below. Unlike automatic drip machines, you control every variable in the process, from water temperature to pour speed.
The basic mechanics of pour over
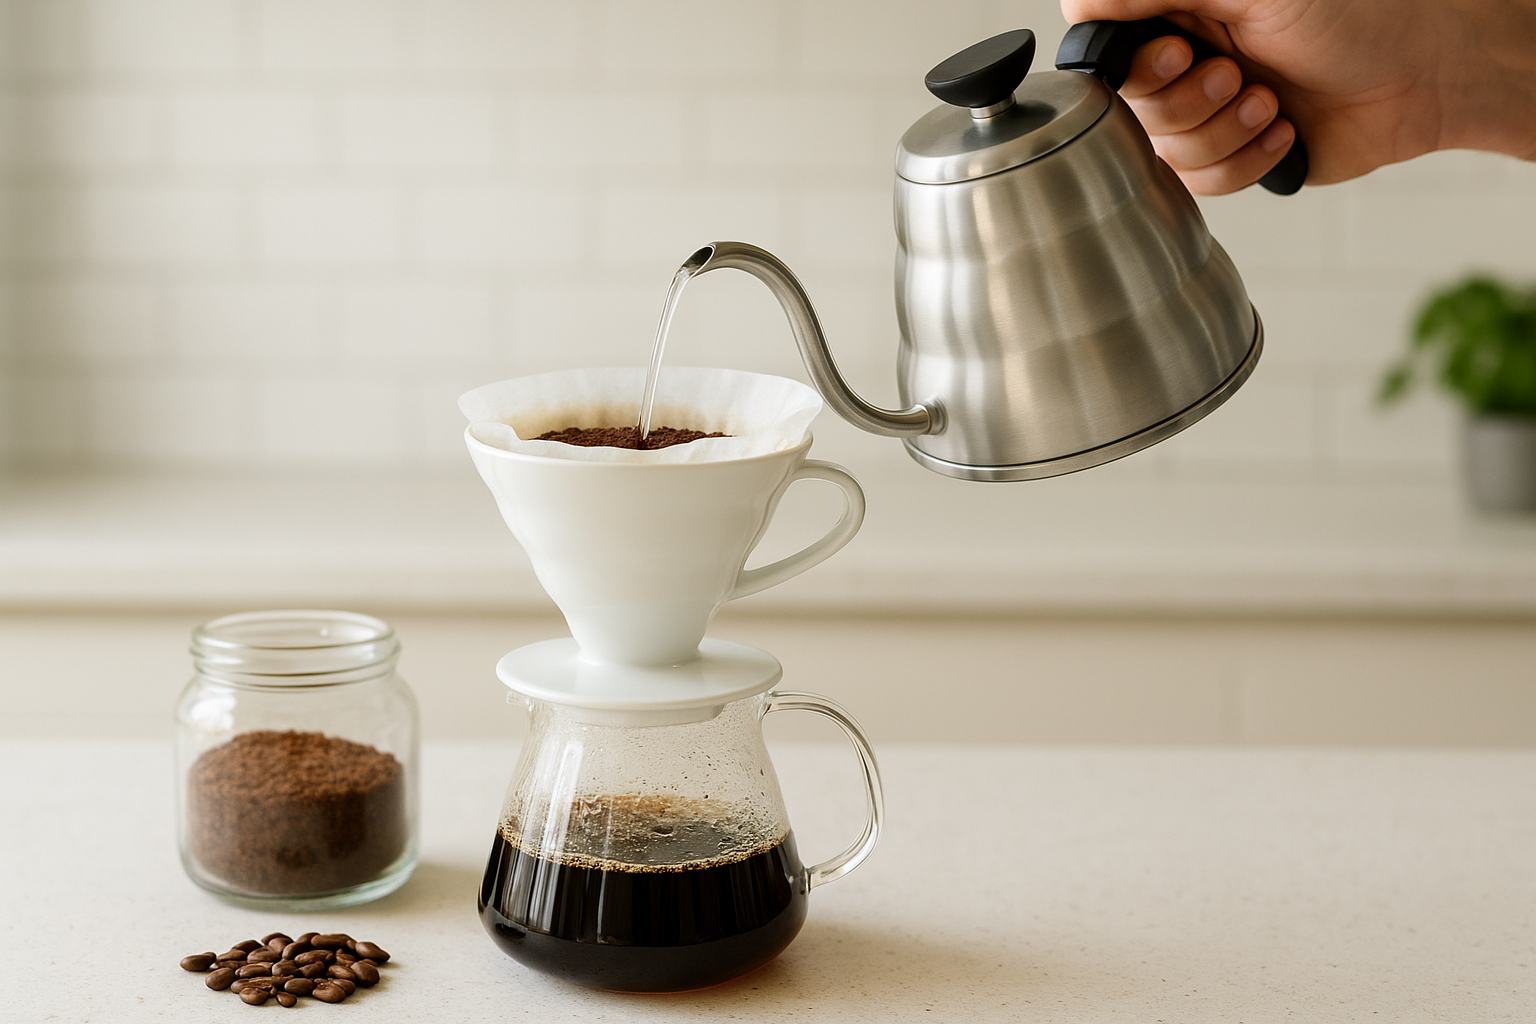
You start with a pour over dripper (like a V60, Chemex, or Kalita Wave), place a paper or metal filter inside, add freshly ground coffee, and pour hot water in circular motions. Gravity pulls the water through the coffee bed at a rate you control with your pour speed. The entire process takes 3 to 4 minutes from start to finish. Your kettle, grind size, and pouring technique all affect the final cup.
Why manual control matters for flavor
Manual brewing lets you adjust water temperature, pour patterns, and extraction time to match your coffee beans. Medium roast Ethiopian beans need different brewing than dark roast Hawaiian Kona beans. You can highlight fruity notes in one coffee or bring out chocolate flavors in another by changing how you pour.
Manual control gives you the power to extract exactly what you want from your beans.
This flexibility is what makes what is pour over coffee worth understanding for anyone who wants better coffee at home. Once you learn the basics, you’ll brew cups that cost $5 at coffee shops for pennies per serving.
Step 1. Choose your beans and grind size
Your coffee beans and grind size determine 90% of your pour over’s flavor. You can nail the perfect brewing technique, but stale beans or the wrong grind will ruin your cup every time. Start with whole beans roasted within the last two weeks and grind them right before brewing.
Pick fresh, quality whole beans
You want specialty-grade whole beans roasted recently. Avoid pre-ground coffee because it loses flavor within minutes of grinding. Check the roast date on the bag and use beans within two to four weeks of that date. Medium to light roasts work best for pour over because they highlight the complex flavors you’re trying to extract. Kona coffee from Hawaii brings out fruity and nutty notes that pour over brewing showcases perfectly.
Fresh beans make the difference between drinking coffee and experiencing it.
Set your grinder to medium coarseness
Medium-coarse grind works for most pour over brewers. Your grounds should look like sea salt or coarse sand, not powder or large chunks. Too fine and your coffee tastes bitter because water moves through slowly. Too coarse and you get weak, sour coffee because water rushes through without extracting enough flavor.
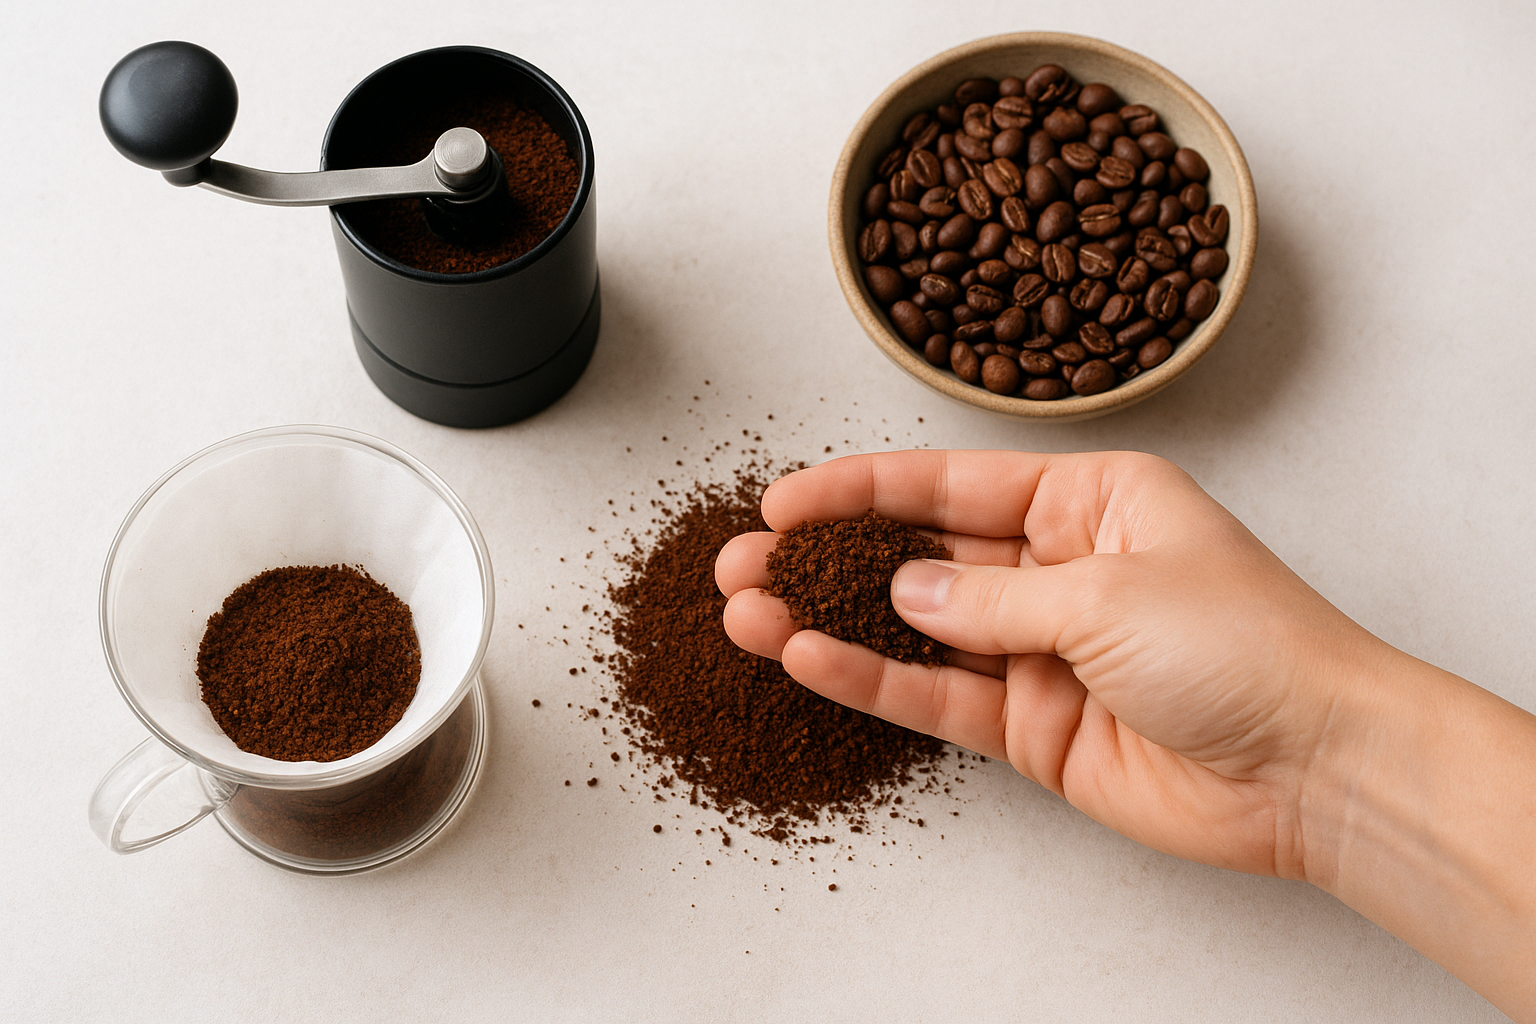
Test your grind by rubbing grounds between your fingers. You should feel distinct particles that don’t clump together. Burr grinders give you consistent particle size, which means even extraction. Blade grinders chop beans unevenly and create bitter flavors from fine particles mixed with coarse chunks.
| Grind Size | Appearance | Result |
|---|---|---|
| Too fine | Like flour | Bitter, over-extracted |
| Just right | Sea salt texture | Balanced, flavorful |
| Too coarse | Like pebbles | Sour, under-extracted |
Adjust your grind finer if coffee tastes sour or brews in under 2:30 minutes. Go coarser if it tastes bitter or takes longer than 4 minutes to brew.
Step 2. Set your water, gear, and brew ratio
Getting your equipment and ratios right makes what is pour over coffee easier to master. You need a few essential tools and the right measurements to brew consistently good coffee. These elements work together to extract the flavors you ground your beans for.
Essential gear for pour over
You need a pour over dripper, paper filters, and a gooseneck kettle. The dripper holds your filter and grounds. Popular options include the Hario V60 (cone-shaped), Kalita Wave (flat-bottomed), and Chemex (hourglass design). Each produces slightly different results, but all work with the same basic technique.
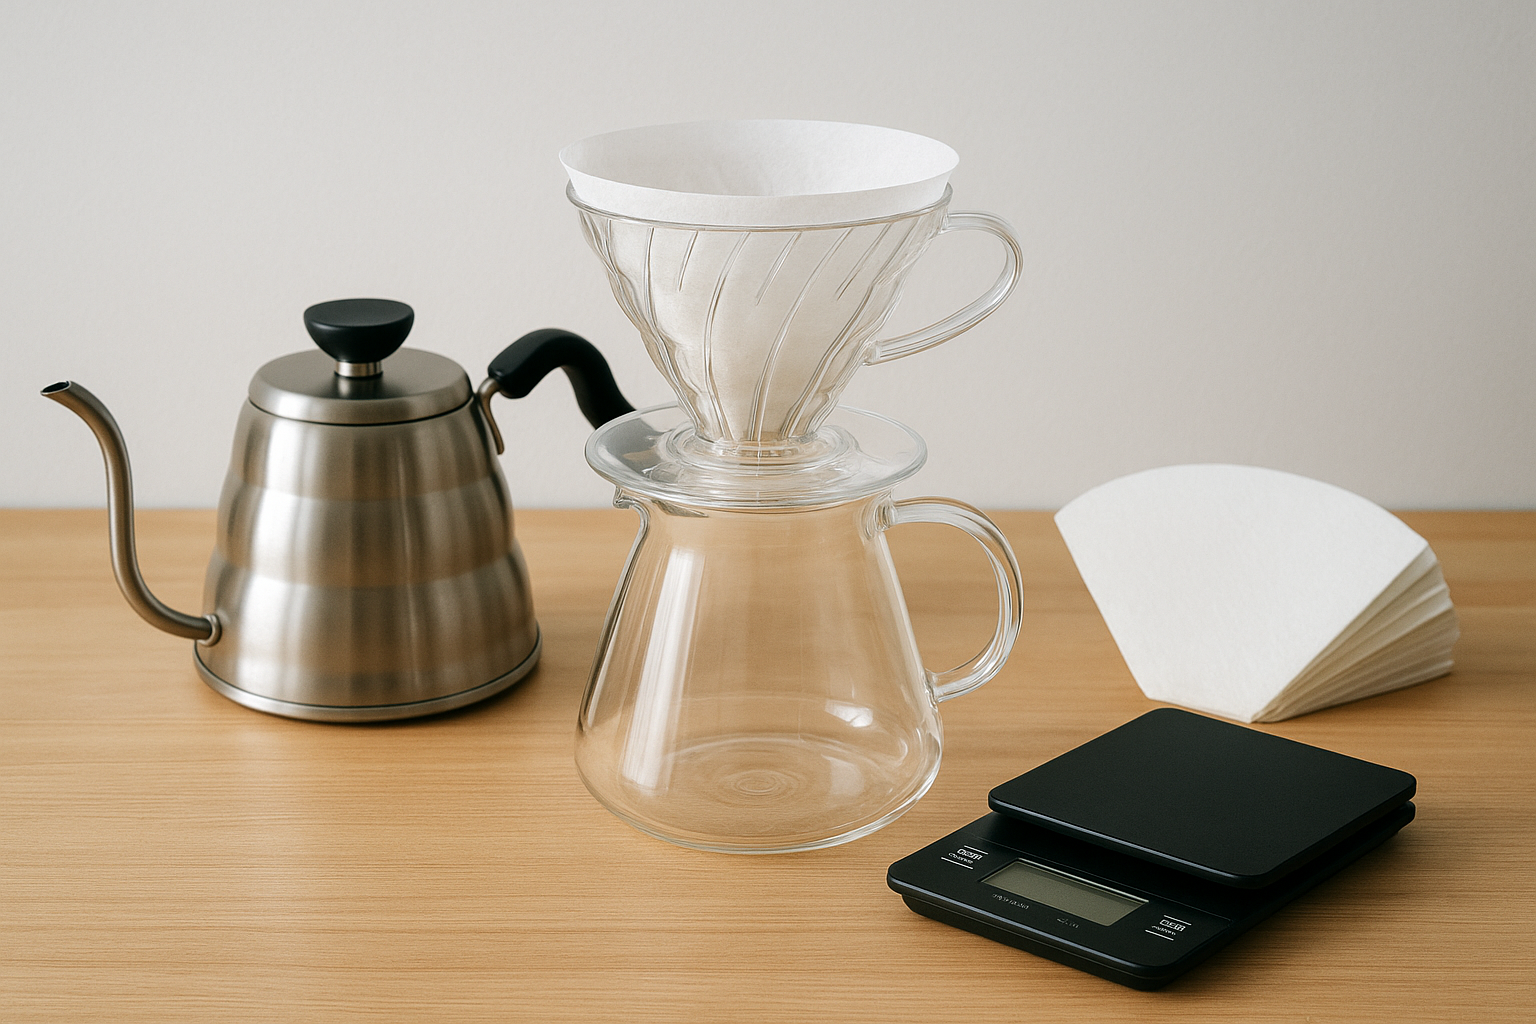
A gooseneck kettle lets you control your pour speed and direction. Regular kettles dump water too fast and unevenly. You also need a digital scale to measure coffee and water accurately. Eyeballing measurements gives you inconsistent results every morning. Add a timer (your phone works fine) to track brew time and you’re ready.
The gooseneck kettle is the single most important tool for consistent pour overs.
Water temperature and quality
Boil your water and let it sit for 30 seconds before brewing. This drops the temperature to 195-205°F, the ideal range for extraction. Water that’s too hot burns the coffee and creates bitter flavors. Water that’s too cool under-extracts and tastes sour.
Use filtered water if your tap water tastes like chlorine or minerals. Coffee is 98% water, so bad water makes bad coffee no matter how good your beans are.
Coffee-to-water ratios that work
Start with a 1:17 ratio (1 gram of coffee for every 17 grams of water). This means 25 grams of coffee for 425 grams of water, which fills a standard mug. Adjust based on your taste.
| Coffee Amount | Water Amount | Cup Size |
|---|---|---|
| 20g | 340g | Small (12 oz) |
| 25g | 425g | Medium (14 oz) |
| 30g | 510g | Large (17 oz) |
Want stronger coffee? Move to 1:15. Prefer it lighter? Try 1:18. Write down your ratios and adjust by small amounts until you find your perfect cup.
Step 3. Brew your pour over step by step
The brewing process follows four distinct stages that take between 3 and 4 minutes total. Each stage serves a specific purpose in extracting flavor from your grounds. Follow these steps in order and pay attention to timing to get consistent results every morning.
Pre-wet your filter and warm your brewer
Place your paper filter in the dripper and pour hot water through it to rinse away paper taste and warm up your brewing vessel. This step takes 10 seconds and makes a noticeable difference in flavor. Dump the rinse water from your cup or carafe, then set your dripper on your scale and zero it out. Add your measured coffee grounds and shake the dripper gently to level the bed. A flat surface helps water flow through evenly.
Bloom the coffee grounds
Pour twice the weight of your coffee in water over the grounds (50 grams of water for 25 grams of coffee). Use a slow, circular motion starting from the center and spiraling outward to saturate all the grounds. You’ll see the coffee bubble and foam as it releases carbon dioxide from roasting. This is called the bloom, and it takes 30 to 45 seconds.

The bloom stage prepares your grounds for even extraction in the main pour.
Start your timer when you begin this first pour. Wait until the bubbling stops before moving to the next stage. Understanding what is pour over coffee means recognizing that rushing this step creates uneven extraction and sour flavors.
Complete the main pour in stages
Pour the remaining water in three equal pulses, waiting 20 to 30 seconds between each pour. For a 425-gram total brew, your pours look like this:
- Bloom: 50g at 0:00, wait until 0:45
- First pour: Add 125g (total 175g) by 1:00
- Second pour: Add 125g (total 300g) by 1:45
- Third pour: Add 125g (total 425g) by 2:30
Pour in steady circles about an inch from the edge of the coffee bed. Never pour directly on the filter. Keep the water level between half and two-thirds full throughout the process.
Finish and serve
Your brew finishes draining between 3:00 and 4:00 minutes on your timer. Remove the dripper once dripping slows to occasional drops. Swirl your cup gently to mix the coffee, then taste it. Take notes on what you liked or didn’t like so you can adjust your grind size or ratio next time. Your first few attempts might not be perfect, but you’ll dial in your technique within a week of daily brewing.
How pour over compares to drip coffee
Drip coffee makers heat water and spray it over grounds automatically, following a preset program you can’t change. Pour over puts every brewing variable in your hands. Both methods use gravity to pull water through coffee grounds, but the similarities end there. Understanding the differences helps you decide which method fits your mornings better.
Control and flavor differences
Drip machines heat water to around 190°F (below the ideal range) because higher temperatures can damage plastic parts. They spray water unevenly, soaking some grounds more than others. Pour over lets you heat water to exactly 200°F and pour it precisely where you want it. This control produces more complex flavors with better balance. You’ll taste subtle notes in your beans that drip coffee mutes or misses entirely. When people ask what is pour over coffee, this flavor difference is the main reason it exists.
Pour over highlights flavors that automatic drip machines leave behind.
Time and convenience trade-offs
Drip machines win on convenience. You add grounds and water, press a button, and walk away. The coffee is ready in 5 minutes without any attention from you. Pour over requires 3 to 4 minutes of active pouring and attention. You can’t multitask during brewing. Drip machines also brew multiple cups at once, while pour over makes one cup at a time. Your choice depends on whether you value convenience or flavor control more in your daily routine.
Brew better coffee with pour over
You now understand what is pour over coffee and how to make it at home. The process takes practice, but you’ll improve with each cup you brew. Start with the 1:17 ratio, medium-coarse grounds, and water just off boiling. Track your results in a notebook and adjust one variable at a time until you find your perfect cup.
Pour over brewing rewards attention and patience with flavors you can’t get from automatic machines. You’ll taste the difference between Hawaiian Kona, Ethiopian Yirgacheffe, and Colombian beans in ways that drip coffee never shows you. The investment in a gooseneck kettle and dripper pays for itself within weeks compared to coffee shop prices.
Ready to taste what your coffee can really do? Browse our fresh-roasted Kona coffee and experience the difference that quality beans make in your daily pour over ritual.