How To Clean A Pour Over Coffee Maker: Daily & Deep Clean
A perfectly brewed pour-over starts with clean equipment. At Menehune Coffee Company, we’ve spent years perfecting our 100% Kona coffee from the slopes of Mauna Loa, and we’ve learned that even the finest beans can’t overcome a grimy brewer. Knowing how to clean a pour over coffee maker properly is essential if you want every cup to taste as fresh as your first.
Coffee oils and mineral deposits build up faster than most people realize. That subtle bitter or stale note creeping into your morning brew? It’s likely residue from yesterday’s coffee, or last week’s. Left unchecked, these deposits affect flavor, clog your filter, and can even harbor bacteria.
This guide walks you through both daily maintenance and deep-cleaning methods to keep your pour-over in top condition. Whether you’re using a Chemex, Hario V60, or any other dripper, you’ll find practical steps using soap, vinegar, and other household items. A few minutes of regular care translates directly to better-tasting coffee.
What you need and how often to clean
You don’t need specialized equipment to keep your pour-over brewer spotless. Most items already sit in your kitchen, and the cleaning process takes just minutes when you stay consistent. Understanding how to clean a pour over coffee maker starts with gathering the right supplies and establishing a routine that prevents buildup before it becomes a problem.
Basic cleaning supplies
Your cleaning arsenal should include mild dish soap, white vinegar, and soft brushes or sponges. Dish soap handles daily washing, while vinegar tackles mineral deposits that accumulate from your water. You’ll also want a bottle brush if you own a Chemex or similar brewer with a narrow neck, plus microfiber cloths for drying and polishing glass components.
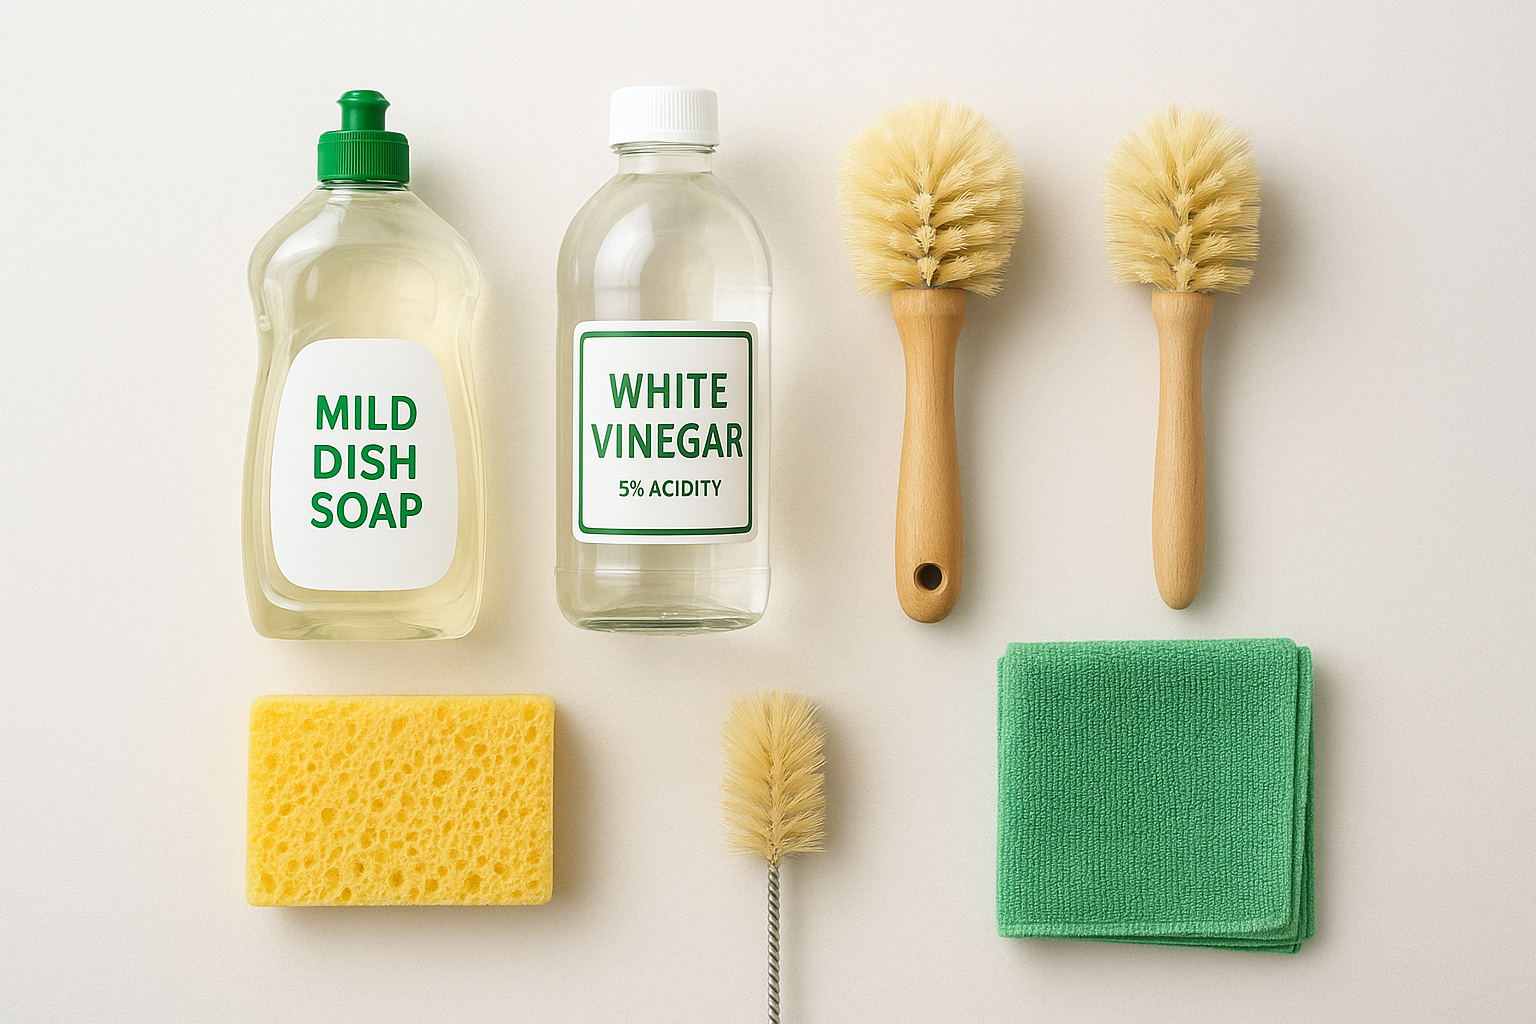
Here’s what to keep on hand:
- Mild dish soap (avoid antibacterial versions with heavy fragrances)
- White distilled vinegar (5% acidity)
- Soft-bristle brush or non-abrasive sponge
- Bottle brush for narrow-neck brewers
- Microfiber cloths for drying
- Baking soda (optional, for stubborn stains)
- Commercial descaler (optional alternative to vinegar)
Avoid abrasive scrubbers or harsh chemicals that can scratch glass or leave residue. Your pour-over touches your coffee directly, so anything you use for cleaning must rinse completely clean.
Clean equipment is the foundation of great coffee. Residue from yesterday’s brew becomes tomorrow’s bitter aftertaste.
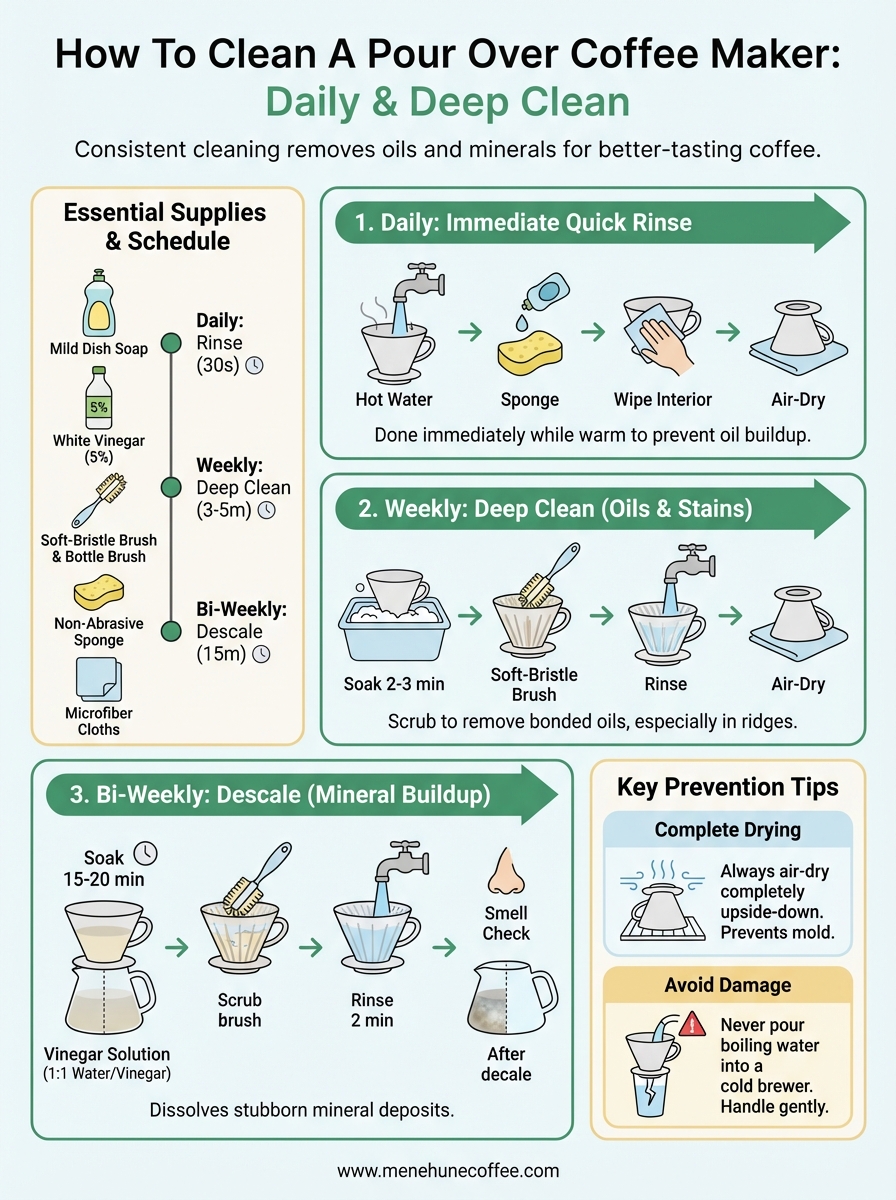
Cleaning frequency schedule
Daily rinsing after each use prevents most problems before they start. This quick wash takes 30 seconds and removes fresh coffee oils while they’re still easy to clean. Weekly deep cleaning removes buildup that regular washing misses, particularly the invisible film of coffee oils that cling to glass and ceramic.
Your cleaning schedule should look like this:
| Frequency | Task | Time Required |
|---|---|---|
| After each use | Rinse with hot water and soap | 30 seconds |
| Weekly | Deep clean with soap and brush | 3-5 minutes |
| Bi-weekly | Descale with vinegar solution | 15 minutes |
| Monthly | Inspect for damage or stubborn stains | 5 minutes |
Hard water accelerates mineral buildup, so you may need to descale more frequently if your tap water leaves spots on dishes or feels chalky. Coffee drinkers who brew multiple pots daily should deep clean twice weekly. Conversely, weekend-only brewers can extend the deep-clean interval to every 10 days.
Paper filter users have an advantage because filters trap most oils before they reach your brewer. Metal mesh filters allow more oils through, which means these brewers need more frequent attention. Adjust your schedule based on what you observe: if you notice any discoloration, film, or off-flavors, increase your cleaning frequency until the problem disappears.
Step 1. Do a quick daily clean after brewing
The most effective cleaning happens immediately after you finish pouring your last cup. Fresh coffee residue washes away in seconds, while oils that sit for hours harden into a sticky film that requires scrubbing. This daily rinse takes less than a minute and prevents 90% of the buildup that ruins coffee flavor.
Why immediate cleaning matters
Coffee oils oxidize rapidly when exposed to air. Within 30 minutes of brewing, these oils begin bonding to your brewer’s surface, creating a layer that hot water alone won’t remove. Each brewing session adds another microscopic layer, and after a week of skipping this quick clean, you’ve built up enough residue to noticeably affect taste.
Temperature makes the difference in how easily residue releases. The glass or ceramic of your pour-over stays warm for several minutes after brewing, and oils remain liquid during this window. Wait until your brewer cools to room temperature, and those same oils require mechanical scrubbing to remove.
Daily cleaning takes 60 seconds. Weekly scrubbing to fix neglected buildup takes 10 minutes. The choice is yours.
Quick clean process
Start by discarding your filter and grounds immediately after the last drop falls. Don’t let used grounds sit in your brewer while you drink your coffee, as the grounds continue releasing oils and tannins that stain surfaces.
Follow these steps while your brewer is still warm:
- Rinse under hot tap water for 15 seconds, rotating the brewer to hit all surfaces
- Add two drops of mild dish soap to a soft sponge
- Wipe all interior surfaces with the soapy sponge, including the spout and rim
- Rinse thoroughly under hot water for 30 seconds, ensuring no soap remains
- Shake out excess water and place upside-down on a clean towel to air-dry
For brewers with ridges or spiral designs like the Hario V60, use a soft-bristle brush instead of a sponge to reach into the grooves. Run the brush in a circular motion following the pattern of the ridges.
Never stack a wet brewer inside another vessel or seal it in a cabinet. Air circulation prevents moisture from becoming a breeding ground for mold and bacteria. Position your brewer where air reaches all surfaces, or dry it completely with a microfiber cloth before storing.
This daily routine is the foundation of knowing how to clean a pour over coffee maker properly. Skip it occasionally and you’ll notice no immediate change, but skip it regularly and you’ll discover unwanted bitterness creeping into even the finest beans from Menehune Coffee Company. Consistency beats intensity in coffee equipment maintenance.
Step 2. Remove coffee oils and stains safely
Daily rinsing catches most residue, but coffee oils penetrate porous materials and create invisible films on glass surfaces. These oils accumulate over days of brewing, and you won’t see them until they’ve altered your coffee’s flavor. Understanding how to clean a pour over coffee maker means addressing this hidden layer that regular washing leaves behind.
Why oils build up despite daily cleaning
Coffee contains natural oils that survive the brewing process and cling to every surface they touch. Dish soap removes surface oils, but molecules bond to microscopic irregularities in ceramic and glass that soap can’t reach during a quick rinse. Each brewing session deposits another thin layer, and within two weeks you’ve built up enough oil to create a rancid taste.
Temperature changes cause these oils to migrate deeper into materials. Hot water during brewing opens pores in ceramic, and oils seep in as the material cools. This explains why white ceramic pour-overs develop a brown tint after months of use, even with daily washing.
Oil buildup is cumulative. Two weeks of brewing deposits more residue than a year’s worth of daily rinsing can fully remove.
Weekly deep clean method
Set aside five minutes once weekly for a thorough cleaning that reaches bonded oils. Warm water works better than cold because it softens oils before you scrub, but avoid boiling water on glass brewers that have cooled to room temperature as thermal shock can cause cracks.
Fill your sink or a basin with hot tap water and follow this sequence:
- Submerge your brewer completely in hot water with three drops of dish soap
- Let it soak for 2-3 minutes to loosen oils
- Scrub all interior surfaces using a soft-bristle brush in circular motions
- Pay extra attention to the spout where oils concentrate
- Rinse under hot running water for 45 seconds, rotating to hit all angles
- Inspect for any brown film by holding the brewer up to light
- Repeat scrubbing if you see discoloration
- Air-dry upside-down on a clean towel
For stubborn stains on white ceramic, make a paste using three parts baking soda to one part water. Apply this paste to stained areas, let it sit for five minutes, then scrub gently with a soft sponge. Baking soda acts as a mild abrasive that won’t scratch surfaces but removes oxidized oils that have darkened over time.
Glass brewers benefit from a vinegar wipe between deep cleans. Dampen a microfiber cloth with white vinegar and polish the interior after your weekly soap scrub. This removes any soap residue and prevents mineral spots from forming.
Step 3. Descale mineral buildup with vinegar or cleaner
Water carries dissolved minerals that separate during brewing and bond to your pour-over’s surface. Calcium and magnesium deposits appear as white, chalky films that water alone won’t remove, and they accumulate faster than coffee oils. Learning how to clean a pour over coffee maker includes recognizing when mineral buildup requires descaling, not just soap and water.
Signs you need to descale
Visual inspection reveals most mineral problems. Hold your brewer up to natural light and look for cloudy white patches, particularly around the bottom where water pools longest. Glass brewers show buildup more obviously than ceramic, but both materials suffer the same deposits.
You’ll notice these warning signs:
- White or rainbow-colored film on interior surfaces
- Slower drip rate as minerals clog the drainage hole
- Rough texture when you run your finger along smooth surfaces
- Persistent cloudiness after washing with soap
- Visible scaling around the rim or spout
Water quality determines descaling frequency. Hard water requires monthly descaling, while soft water extends this interval to every 8-10 weeks. You can test your water hardness by observing how soap lathers; poor lather indicates high mineral content.
Mineral deposits reduce flow rate by up to 40%, extending brew time and over-extracting your coffee into bitterness.
Vinegar descaling process
White distilled vinegar dissolves mineral deposits safely without damaging glass, ceramic, or stainless steel. Mix equal parts white vinegar and water in a ratio that fills your brewer halfway, typically one cup of each for standard pour-overs.

Follow this descaling sequence:
- Pour the vinegar solution into your brewer until it reaches the halfway point
- Let it sit for 15-20 minutes without agitation
- Swirl the solution to coat all interior surfaces
- Pour out the solution and inspect for remaining deposits
- Scrub stubborn spots with a soft brush dipped in straight vinegar
- Rinse thoroughly under hot water for two full minutes
- Sniff the brewer to ensure no vinegar odor remains
- Run a water-only brew cycle before making coffee
Ceramic brewers may need 30 minutes of soaking if you’ve skipped descaling for several months. Glass responds faster because minerals bond less aggressively to smooth surfaces.
Commercial descaler option
Specialized coffee equipment descalers work faster than vinegar and leave no odor. Purchase descaler formulated specifically for coffee equipment, not general household products. Follow the manufacturer’s dilution instructions exactly, as concentrated formulas can etch glass if used incorrectly.
Most commercial descalers require only 10 minutes of contact time and rinse cleaner than vinegar. They cost more but prove worthwhile if vinegar’s smell bothers you or if severe scaling resists home remedies.
Step 4. Prevent bad flavors, mold, and damage
Prevention saves more time than correction when maintaining your pour-over equipment. Proper storage and handling habits eliminate the conditions that cause stale flavors, bacterial growth, and physical damage. Knowing how to clean a pour over coffee maker extends beyond washing techniques to include the daily practices that keep your brewer pristine between uses.
Ensure complete drying before storage
Moisture creates the perfect environment for mold, bacteria, and mineral spotting. Never store your brewer while any dampness remains, even if you plan to use it again in a few hours. Water trapped in crevices or the drainage hole breeds microorganisms that contaminate your next brew.
Air-drying delivers better results than towel-drying because fabric can leave behind lint and transfer bacteria. Position your brewer upside-down on a clean dish rack where air circulates freely around all surfaces. Glass brewers typically dry within 30 minutes at room temperature, while ceramic may require 45 minutes due to its porous nature.
Check these critical areas before storage:
- Drainage hole at the bottom (blow through it gently)
- Interior ridges or spiral grooves
- Spout and rim edges
- Junction between base and body on multi-piece brewers
- Underside where condensation collects
Store your dried brewer in an open cabinet or on a shelf, never sealed in a drawer or covered container. Trapped air becomes stale and humid, inviting mold growth even on completely dry surfaces.
Protect against physical damage
Temperature shock cracks glass brewers faster than any other form of damage. Never pour boiling water into a cold brewer or rinse a hot brewer under cold water. Let your equipment reach room temperature naturally, or warm a cold brewer by filling it halfway with lukewarm water first.
Handle your pour-over with care during cleaning. Glass and ceramic chip easily when knocked against sink edges or faucets. Dedicate a soft towel or rubber mat as a cushioned workspace where you clean your brewer, and avoid stacking other dishes on top during drying.
A cracked brewer isn’t just damaged equipment. It’s a safety hazard that can break completely during brewing and send hot coffee across your counter.
Inspect your brewer monthly for hairline cracks that appear invisible until held up to bright light. Replace any brewer showing cracks immediately, as thermal stress during brewing will expand even minor damage into catastrophic failure. Prevention through gentle handling costs nothing, while replacement runs $25 to $50 for quality pour-over equipment.
Keep your pour over tasting clean
Mastering how to clean a pour over coffee maker requires consistency, not complexity. Daily rinsing after each brew, weekly deep cleaning with soap, and bi-weekly descaling with vinegar form a simple routine that protects your investment and preserves flavor. These three steps take less than 30 minutes total per month, yet they prevent the rancid oils, mineral deposits, and bacterial growth that ruin even the finest coffee.
Your cleaning efforts mean nothing if your beans start stale or poorly roasted. Quality coffee deserves clean equipment, and clean equipment deserves quality beans. At Menehune Coffee Company, we grow and roast 100% Kona coffee on the slopes of Mauna Loa with the same attention to detail you’re now bringing to your brewing setup. Fresh beans and clean equipment work together to create the exceptional cup you’re after.
Start your next brew with confidence. Your pour-over is clean, your technique is solid, and you’re ready to taste coffee exactly as it should be.