Strong Cold Brew Recipe: Ratios, Grind, Steep, Dilution Tips
You bought all the fancy equipment, followed a recipe you found online, and waited patiently overnight. But when morning comes, your cold brew tastes more like coffee-flavored water than the bold, concentrated brew you expected. Weak cold brew is frustrating, especially when you’re craving that smooth, powerful kick that makes cold brew worth the wait.
The fix comes down to mastering a few critical variables: your coffee-to-water ratio, grind size, steep time, and how you dilute the final product. Get these right, and you’ll brew a strong cold brew recipe that rivals anything you’d pay premium prices for at a coffee shop. The difference between disappointing and delicious is often just adjusting your ratios and technique.
This guide walks you through each step of making intensely flavorful cold brew at home. You’ll learn the exact ratios that produce concentrated results, how to grind your beans for maximum extraction, the optimal steeping window for bold flavor without bitterness, and how to store and dilute your concentrate to perfection. Whether you’re new to cold brewing or fixing a recipe that’s been letting you down, these techniques will help you nail it every time.
What you need for strong cold brew
Making a strong cold brew recipe doesn’t require expensive equipment or specialty tools. You need whole coffee beans, filtered water, a container for steeping, and a way to strain out the grounds. The simplicity of cold brew is one of its biggest advantages, but choosing the right beans and having a reliable filtering method makes a noticeable difference in the final strength and flavor.
Essential equipment
Your brewing setup can be as simple or sophisticated as you want. At minimum, you need a large jar or pitcher (quart-sized mason jars work perfectly), cheesecloth or a coffee filter, and a fine-mesh strainer. A burr grinder is ideal if you’re grinding beans at home, though you can have your local roaster grind them for you on a coarse setting.
Optional but helpful tools include:
- French press (doubles as both brewing vessel and strainer)
- Dedicated cold brew maker with built-in filter
- Kitchen scale for precise measurements
- Large measuring cup for easy pouring
Coffee beans and water
Coffee quality directly impacts your brew’s strength and taste. Start with fresh, whole beans from a roast date within the past month, preferably a medium to dark roast for bold, chocolatey flavors. Light roasts can work, but they often taste thinner in cold brew since the brewing method emphasizes body over brightness.
Water quality matters just as much as bean quality. Filtered or bottled water eliminates chlorine and mineral flavors that can muddy your coffee’s taste. If your tap water tastes good on its own, it will work fine, but filtration removes variables that might interfere with extraction.
The beans you choose set the ceiling for quality, but proper technique unlocks their full potential.
Temperature is straightforward: you’ll use room temperature or cold water from the tap or fridge. Both work equally well, though room temperature may extract slightly faster during the steeping process.
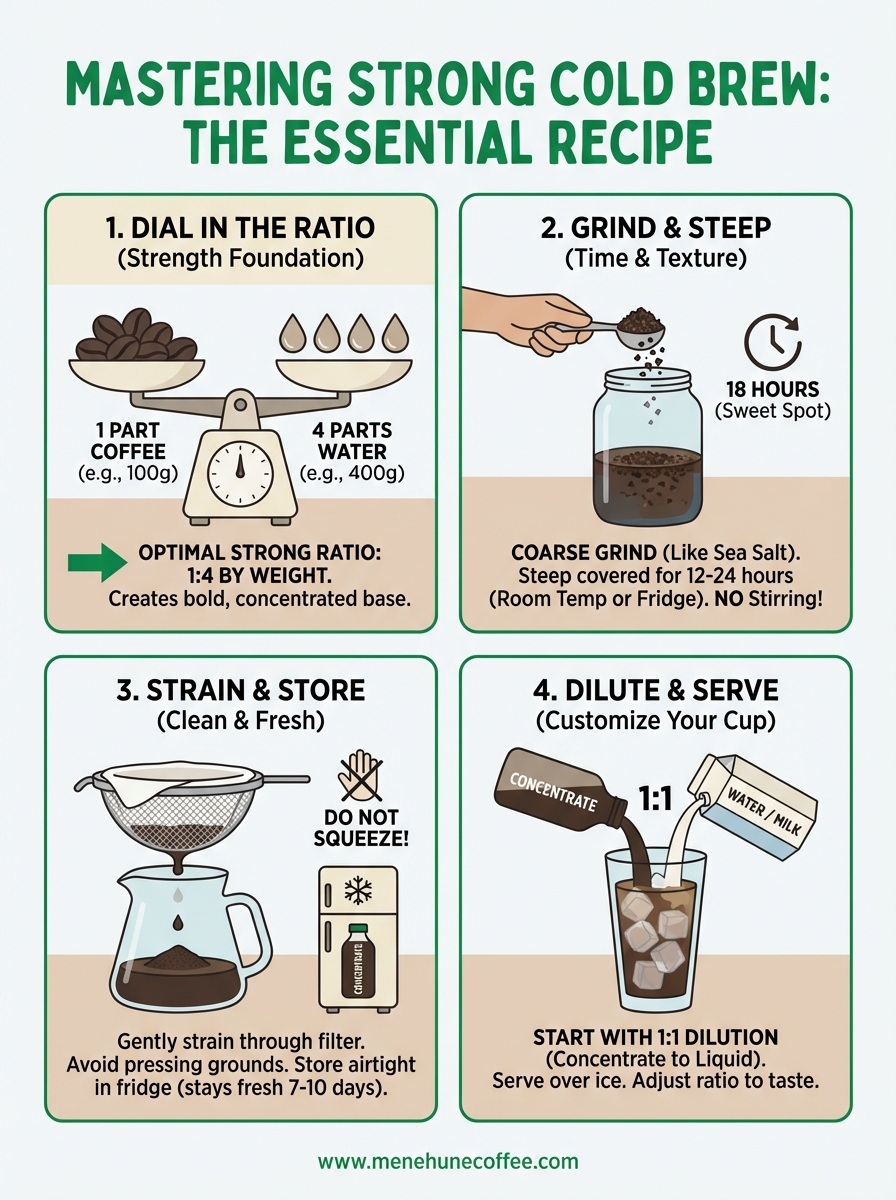
Step 1. Dial in your cold brew ratio
The coffee-to-water ratio determines everything about your cold brew’s final strength. Too much water creates a thin, underwhelming drink that needs heavy dilution, while too little water produces muddy, over-extracted flavors. Getting this ratio right is the single most important factor in brewing a strong cold brew recipe that delivers concentrated flavor without bitterness.
Most cold brew recipes you’ll find online use ratios ranging from 1:4 to 1:8 (coffee to water by weight). Each ratio produces a different concentration level, affecting both the intensity of your brew and how you’ll serve it later. Understanding these ratios helps you control exactly how strong your final cup will be.
Understanding coffee-to-water ratios
Ratios express the relationship between coffee grounds and water by weight, not volume. A 1:4 ratio means one part coffee to four parts water (for example, 100 grams of coffee to 400 grams of water). Weight measurements give you repeatable results every time, unlike volume measurements which vary based on grind size and bean density.
Different ratios serve different purposes:
| Ratio | Strength | Best Use |
|---|---|---|
| 1:4 | Very concentrated | Diluting with milk or water, serving over ice |
| 1:5 | Strong concentrate | Straight over ice or light dilution |
| 1:7 | Moderate strength | Ready-to-drink, minimal dilution needed |
| 1:8 | Lighter brew | Drinking straight, no dilution required |
The 1:4 ratio for maximum strength
The 1:4 ratio produces the strongest, most concentrated cold brew that still tastes smooth. This concentration level works perfectly when you plan to dilute your coffee with milk, cream, or additional water, or when you’re pouring it over ice that will melt and naturally reduce the intensity.
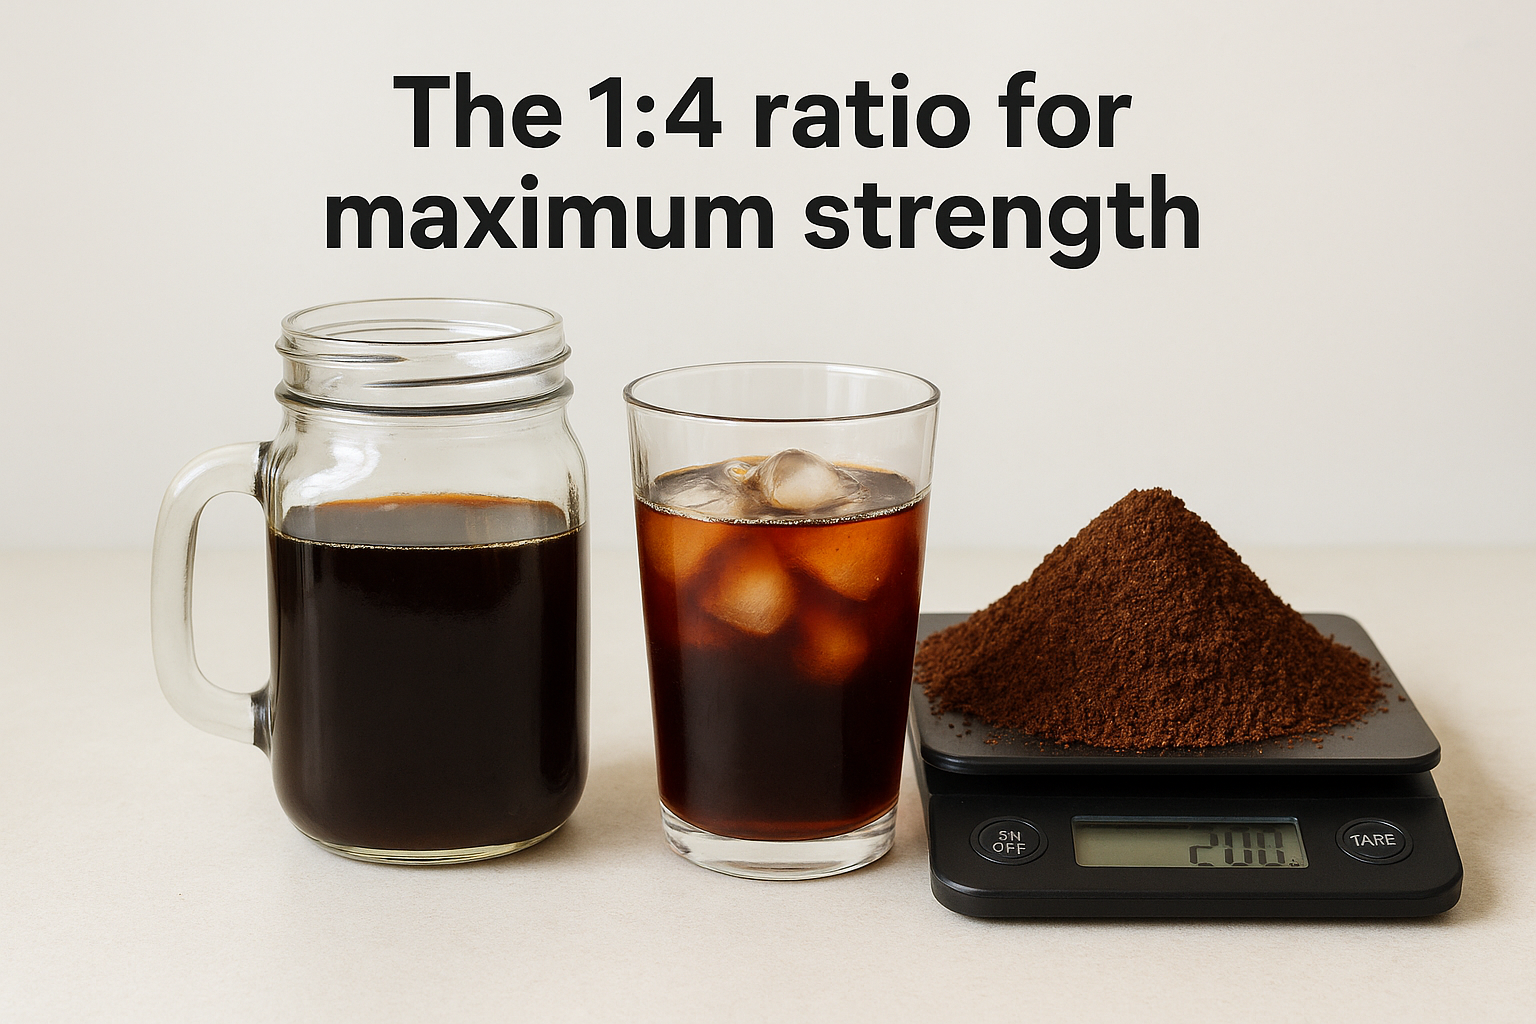
Here’s what 1:4 looks like in practice:
- 100 grams coffee + 400 grams water = approximately 2 cups of concentrate
- 200 grams coffee + 800 grams water = approximately 1 quart of concentrate
- 250 grams coffee + 1000 grams water = approximately 1 liter of concentrate
If you don’t own a kitchen scale, you can approximate measurements using volume, though results will vary. One cup of whole beans weighs roughly 85-95 grams depending on the roast, and four cups of water equals about 946 grams. This gets you close to a 1:4 ratio, but weighing ingredients removes guesswork entirely.
Brewing at a 1:4 ratio gives you a concentrate that stays bold even after dilution or melting ice.
Adjusting ratios to your preference
Starting with the 1:4 ratio gives you a strong baseline, but you should adjust based on how you like to drink your coffee. If you find your brew tastes too intense even after dilution, try a 1:5 ratio (100 grams coffee to 500 grams water) for your next batch. Prefer drinking cold brew straight from the fridge without dilution? A 1:7 or 1:8 ratio works better.
Keep notes on each batch you make. Record your ratio, bean type, and how the finished brew tastes to you. This simple practice helps you dial in the perfect recipe for your preferences. What works for someone else might not match your taste, and that’s exactly why understanding ratios matters more than blindly following a single recipe.
Step 2. Grind your beans correctly
Grind size directly controls how much flavor extracts from your coffee during the steeping process. Grind too fine and you’ll end up with a muddy, over-extracted mess full of sediment and harsh bitterness. Grind too coarse and your water won’t pull enough flavor, leaving you with a weak, underwhelming brew despite using the right ratio. For a strong cold brew recipe that delivers smooth, concentrated flavor, you need beans ground to a coarse consistency that resembles raw sugar or sea salt.
Coarse grind is non-negotiable
Cold brew extraction happens slowly over many hours, which means your grind size needs to match this extended contact time. A coarse grind provides the optimal surface area for water to extract flavors gradually without pulling out the compounds that cause bitterness. Think of each coffee particle as having a protective layer that slowly releases flavor over time.
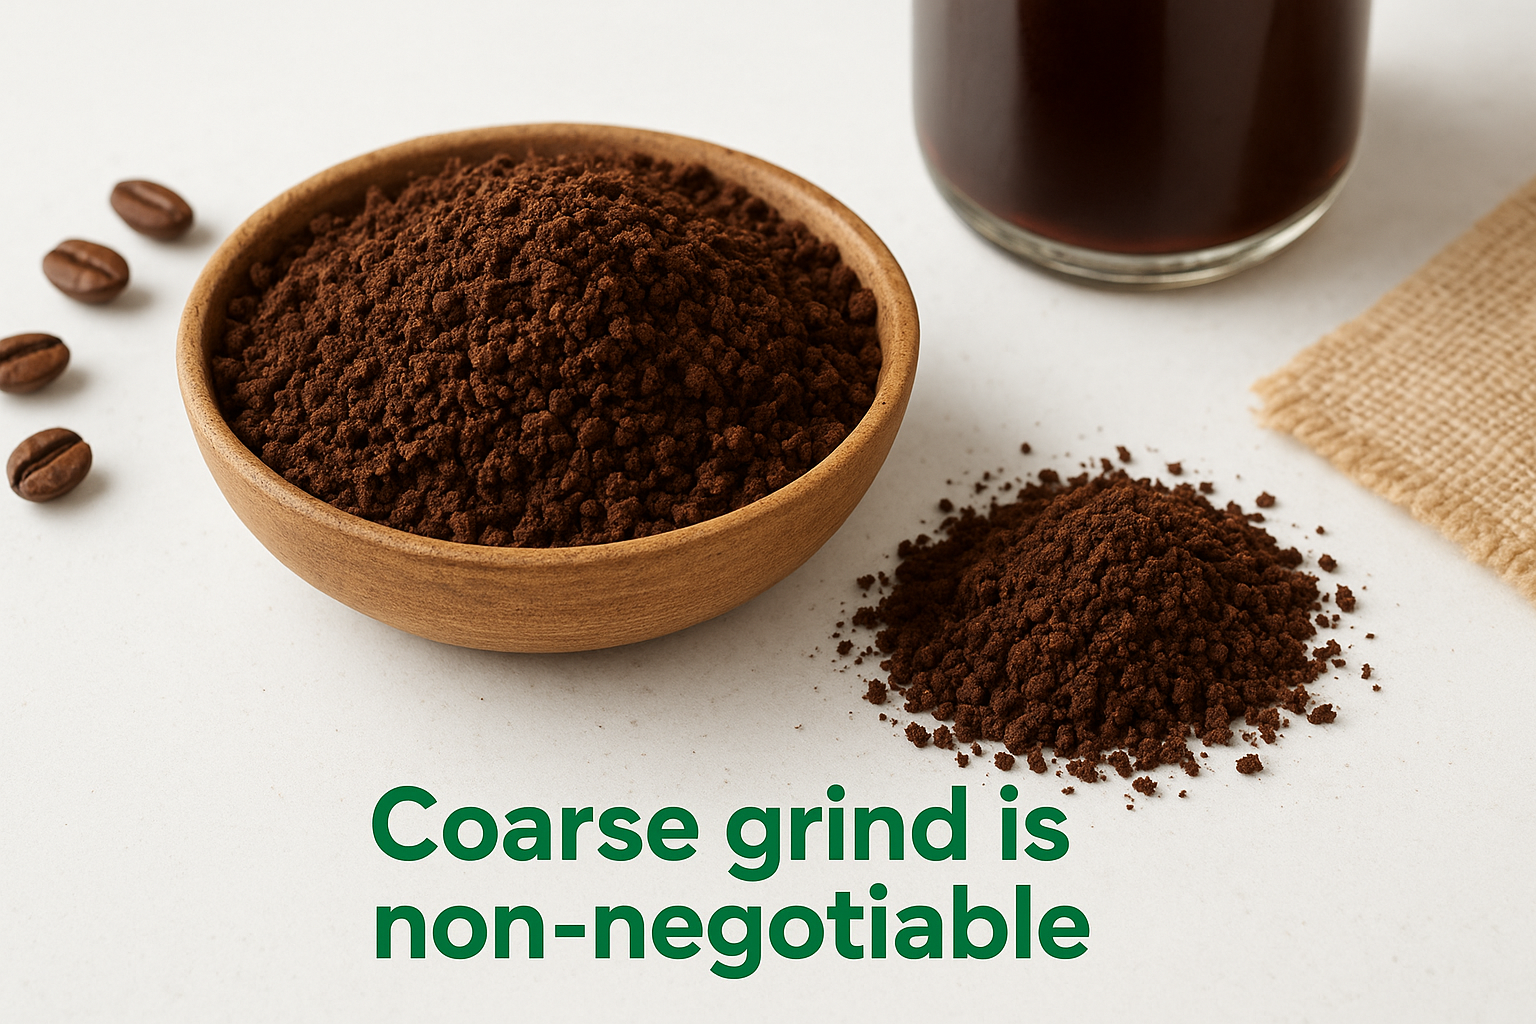
Your coffee should look like coarse breadcrumbs or kosher salt crystals when properly ground. The individual particles should be clearly visible and distinct, not powdery or dusty. If you run your fingers through the grounds, they should feel gritty and rough, similar to raw sugar you’d use for baking.
Here’s what different grind sizes look like compared to common kitchen items:
| Grind Size | Visual Reference | Suitable For |
|---|---|---|
| Extra Coarse | Peppercorns | French press |
| Coarse | Sea salt, raw sugar | Cold brew |
| Medium-Coarse | Coarse sand | Pour over |
| Medium | Regular sand | Drip coffee |
| Fine | Table salt | Espresso |
Coarse grounds resist over-extraction during long steeping times, keeping your cold brew smooth instead of bitter.
Grinding at home vs. buying pre-ground
If you own a burr grinder, set it to the coarsest setting available (often labeled “French press” or “cold brew”). Burr grinders produce uniform particle sizes that extract evenly, giving you consistent strength across your entire batch. Blade grinders work in a pinch, but pulse them briefly in 1-2 second bursts rather than running continuously. This prevents creating too much fine powder that will cloud your final brew.
Don’t have a grinder at all? Ask your local coffee roaster or grocery store to grind your beans on their coarsest setting when you purchase them. Most shops will grind beans for you at no charge. Buy only what you’ll use within a week or two, since pre-ground coffee loses freshness quickly once the beans are broken open.
Avoid pre-ground coffee from the grocery store shelf. These products are ground for drip coffee makers at a medium-fine consistency that’s far too small for cold brew. Using them creates excessive sediment and produces harsh, bitter flavors no matter how carefully you follow the rest of your recipe. Fresh-ground beans at the correct coarseness make all the difference in achieving a strong, smooth concentrate.
Step 3. Combine and steep for bold flavor
The moment you mix your coffee grounds with water begins the extraction process that transforms your beans into a strong cold brew recipe. This step requires minimal active work but demands patience and precision in timing. How you combine your ingredients and where you let them steep directly affects the final concentration and smoothness of your brew.
Mixing your grounds and water
Add your measured coffee grounds to your brewing container first, then pour the water over them in a slow, steady stream. This order helps the grounds disperse evenly throughout the water rather than clumping together at the bottom. Once you’ve added all the water, use a long spoon to stir the mixture thoroughly, ensuring every ground particle gets saturated.
You’ll notice some grounds float on the surface initially. This is normal. Stir gently but completely for 30-45 seconds until all grounds appear wet and most have sunk below the water line. Trapped air pockets prevent proper extraction, so taking time to mix thoroughly now prevents weak spots in your finished brew.
Cover your container with a lid, plastic wrap, or small plate to keep out dust and debris. The covering doesn’t need to be airtight, but it should protect your coffee from absorbing any refrigerator odors if you’re cold-steeping. Leave a small amount of headspace at the top since the grounds will expand slightly as they absorb water.
Steeping time and temperature
Your coffee needs 12 to 24 hours to extract fully, with the sweet spot landing around 18 hours for most strong cold brew recipes. Shorter than 12 hours leaves you with under-extracted, watery coffee. Beyond 24 hours risks pulling bitter compounds that overpower the smooth flavors you’re after.
Room temperature steeping extracts faster than refrigerator steeping, but both methods produce excellent results. Counter steeping at 68-72°F completes extraction closer to the 12-hour mark, while refrigerator steeping at 35-40°F needs the full 18-24 hours. Choose based on your kitchen setup and convenience rather than worrying about dramatic quality differences.
Consistent timing at your chosen temperature produces repeatable results batch after batch.
Set a specific start time and calculate exactly when you’ll strain your coffee. If you begin steeping Saturday at 8 PM and want an 18-hour brew, you’ll strain Sunday at 2 PM. Write this down or set a phone reminder so you don’t forget and accidentally over-steep.
Checking your brew progress
Resist the urge to stir or agitate your coffee once steeping begins. Leaving it undisturbed allows proper extraction without creating excess sediment or muddy flavors. The coffee will look dark and opaque, with most grounds settled at the bottom after the first few hours.
If you’re concerned about strength, you can taste-test after 14-16 hours by carefully scooping out a small amount with a spoon. The concentrate should taste bold and smooth, not thin or overly sharp. Under-extracted coffee tastes weak and acidic, while properly extracted cold brew has a rich, full body with natural sweetness and low acidity.
Never steep longer than 30 hours even if you’re aiming for maximum strength. Extended steeping doesn’t make coffee stronger; it just extracts unpleasant bitter compounds that ruin the smooth character cold brew is known for. Adjust your coffee-to-water ratio if you need more intensity, not your steeping time.
Step 4. Strain, store, and keep it fresh
Your coffee has steeped for the perfect amount of time, and now you need to separate the liquid from the grounds without introducing sediment into your finished concentrate. Proper straining technique preserves the smooth, clean taste you’ve worked to achieve, while smart storage practices keep your strong cold brew recipe fresh and flavorful for days. Rushing through this step or storing your coffee incorrectly wastes all the effort you’ve put into the earlier stages.
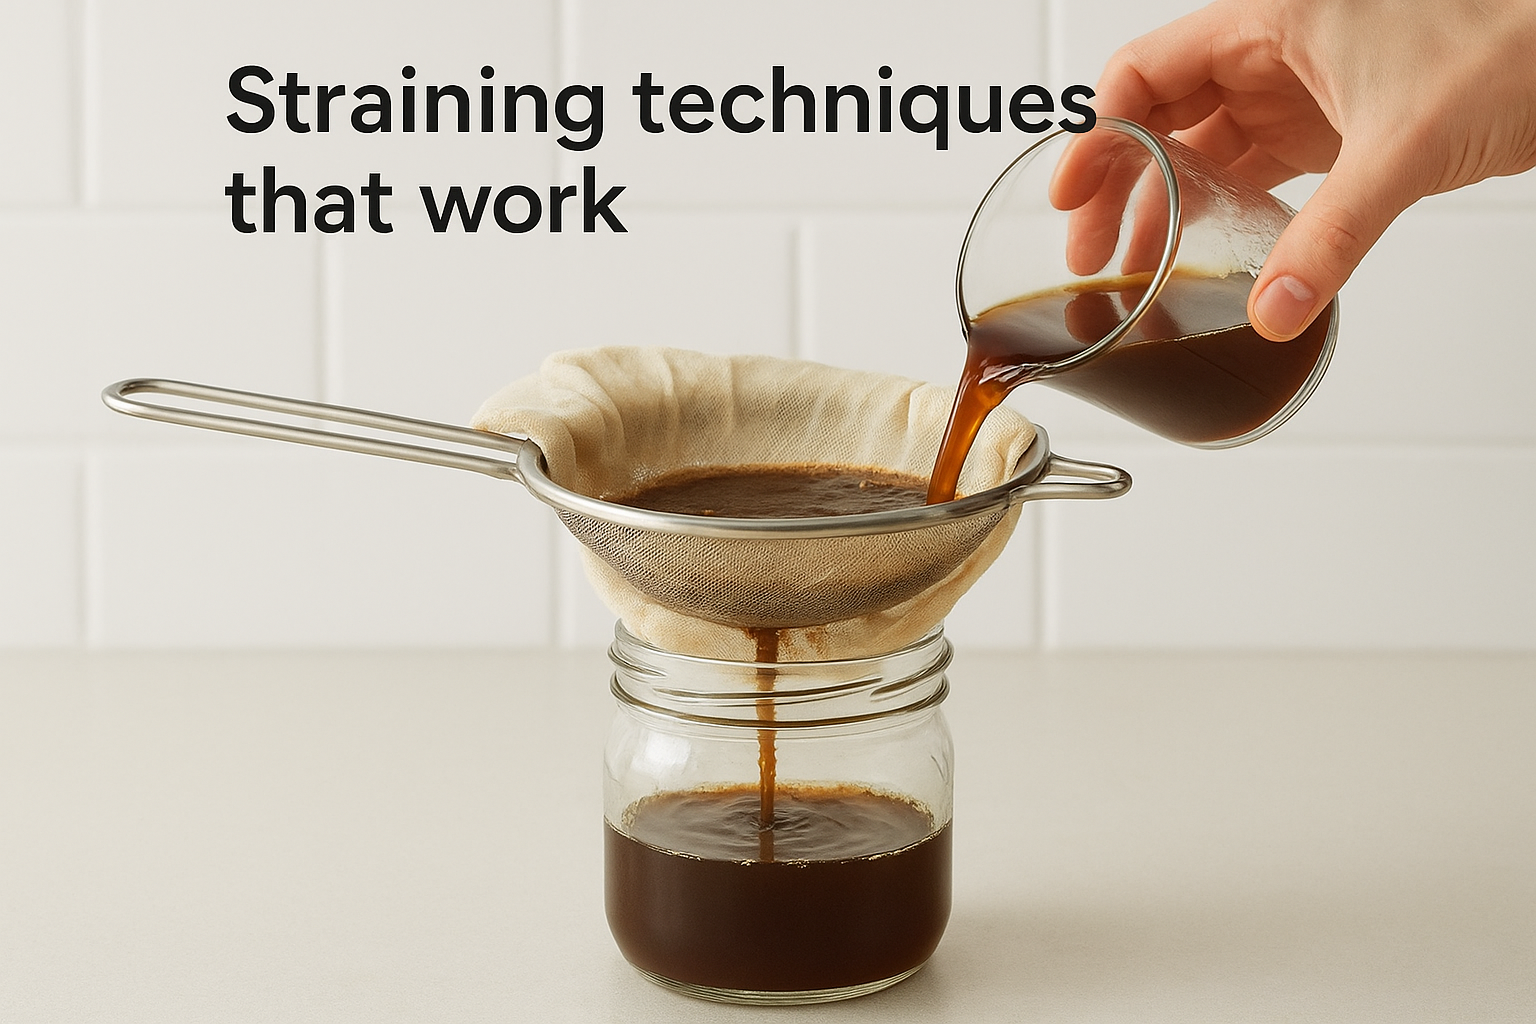
Straining techniques that work
The goal is to remove 100% of the coffee grounds while allowing the liquid to flow through freely. Start by placing a fine-mesh strainer over a large bowl or pitcher, then line it with either cheesecloth, a nut milk bag, or a reusable coffee filter. Pour your cold brew through slowly, allowing gravity to do the work rather than pressing or squeezing.
If you used a French press for brewing, press the plunger down slowly and steadily, then pour the coffee into your storage container. French press filters catch most grounds but may let some fine particles through. For ultra-clean results, strain the pressed coffee one more time through a paper filter or cheesecloth.
You’ll notice the grounds hold a significant amount of liquid. Don’t squeeze or press the grounds to extract more coffee. This forces bitter compounds and sediment into your concentrate, muddying both the flavor and appearance. Let the liquid drip through naturally, even if it takes 5-10 minutes.
Proper storage containers and conditions
Transfer your strained concentrate into a clean, airtight container immediately after straining. Glass jars with tight-fitting lids, swing-top bottles, or sealed pitchers all work perfectly. Avoid containers that previously held strong-smelling foods or drinks, as coffee readily absorbs surrounding odors even through glass.
Store your cold brew in the refrigerator at 35-40°F right away. Room temperature storage accelerates oxidation and bacterial growth, degrading flavor within hours. Cold temperatures slow these processes dramatically, preserving the smooth, concentrated taste you’ve created.
Proper refrigeration extends your cold brew’s prime drinking window from hours to over a week.
How long your concentrate stays fresh
Your cold brew concentrate maintains peak flavor for 7-10 days when stored correctly in the refrigerator. The first three days deliver the absolute best taste, with subtle flavor changes becoming noticeable after day five. Beyond two weeks, oxidation dulls the bright notes and introduces flat, stale flavors that dilution can’t fix.
Watch for these signs your concentrate has gone bad: sour or rancid smell, visible mold growth on the surface, or fizzy bubbles when you pour it (indicating fermentation). Fresh cold brew smells rich and coffee-forward without any sharp or off-putting notes. Trust your nose; if something smells wrong, throw it out and brew a fresh batch.
Label your container with the date you strained the coffee so you always know how old it is. This simple habit prevents guesswork and ensures you’re drinking cold brew at its best rather than past its prime.
Step 5. Dilute and serve to your taste
Your concentrated cold brew sits in the fridge, ready to transform into the perfect cup of coffee. The concentrate you’ve made is too strong to drink straight for most people, and that’s exactly what makes it versatile. Dilution control lets you customize every serving to match your preference, whether you want a bold morning jolt or a smooth afternoon refresher. Understanding how to dilute and serve your strong cold brew recipe properly ensures you get the most out of every batch you make.
Finding your ideal dilution ratio
The standard dilution for cold brew concentrate sits at 1:1 (equal parts concentrate and water or milk), but this serves only as a starting point. Pour 4 ounces of concentrate over ice, then add 4 ounces of water or milk and taste. Too strong? Try a 1:2 ratio (one part concentrate to two parts liquid). Not bold enough? Reduce to 2:1 (two parts concentrate to one part liquid).
Ice affects dilution significantly since it melts into your drink. If you’re serving over ice, start with less liquid than you think you need. A glass filled with 6 ounces concentrate and 2 ounces water over a full cup of ice ends up perfectly balanced as the ice melts during drinking.
The beauty of concentrate lies in how easily you adjust each serving without brewing a new batch.
Here’s a practical dilution guide based on serving size:
| Serving Size | Concentrate | Water/Milk | Ice | Result |
|---|---|---|---|---|
| 8 oz | 3 oz | 2 oz | 1 cup | Bold |
| 12 oz | 4 oz | 4 oz | 1 cup | Balanced |
| 16 oz | 4 oz | 8 oz | 1 cup | Smooth |
Serving options that work
Cold brew shines when served over ice in a tall glass, but you can also enjoy it hot. Microwave diluted concentrate for 45-60 seconds until steaming, and you’ll have hot coffee that tastes remarkably smooth compared to traditionally brewed coffee. The lower acidity makes it easier on your stomach too.
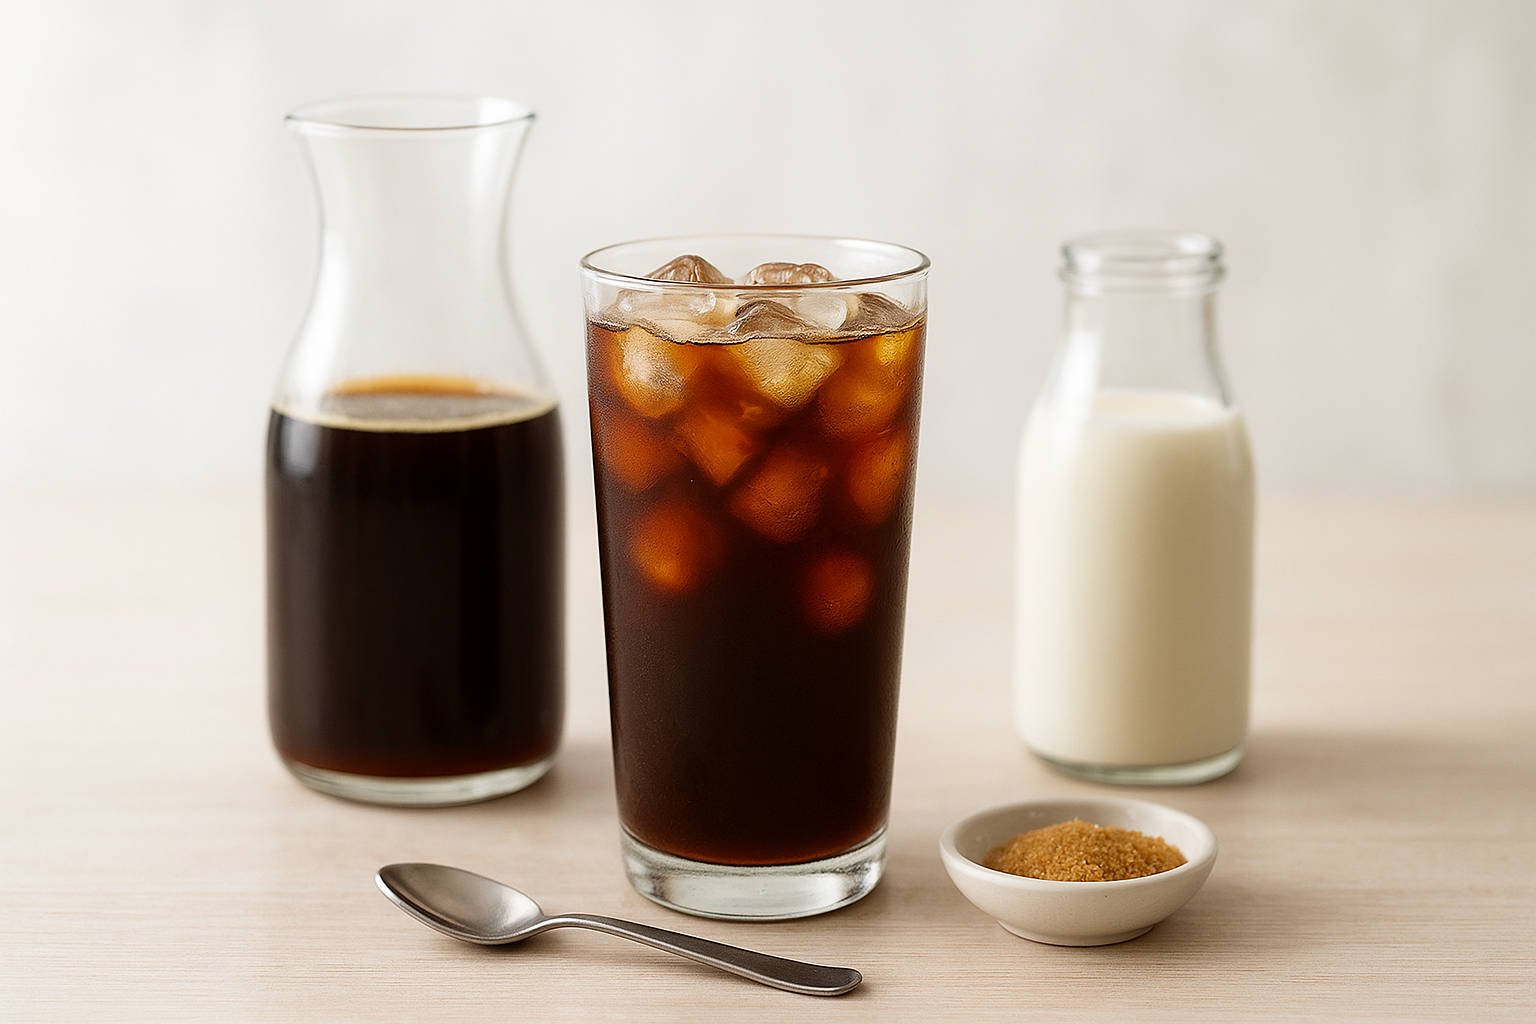
Milk-based drinks benefit from concentrate’s strength. Mix 3 ounces concentrate with 5 ounces of whole milk or oat milk over ice for a homemade version of cafe-style iced lattes. The coffee flavor cuts through the milk clearly without disappearing.
Sweeteners and flavor additions
Concentrated cold brew dissolves sweeteners better than iced coffee made from hot-brewed coffee. Simple syrup, honey, or maple syrup blend smoothly into cold concentrate without leaving grainy residue. Start with 1 teaspoon per 8 ounces of prepared drink and adjust upward.
Vanilla extract (1/4 teaspoon) or cinnamon (a pinch) added directly to your serving glass creates flavored coffee without buying expensive syrups. Cocoa powder mixed with a small amount of hot water first, then stirred into your cold brew, makes an instant mocha. Keep additions simple and measure carefully since concentrate’s bold flavor can either complement or clash with add-ins depending on proportions.
Fixing weak or bitter cold brew
You followed every step carefully, but your finished cold brew doesn’t taste right. Either it’s too weak and watery, or it’s harsh and unpleasantly bitter. Both problems stem from specific, fixable mistakes in your process, and identifying which variable went wrong lets you correct it in your next batch. Understanding what causes weak versus bitter coffee helps you troubleshoot any strong cold brew recipe and dial in the exact taste you’re after.
When your cold brew tastes weak
Weak cold brew happens when water extracts too little flavor from your coffee grounds during steeping. You’re left with something that tastes more like coffee-flavored water than the bold concentrate you expected. Several factors cause under-extraction, and you need to identify which one applies to your situation.
Check these common causes of weak cold brew:
| Problem | Solution |
|---|---|
| Coffee-to-water ratio too low | Increase to 1:4 or 1:5 ratio |
| Grind too coarse | Use slightly finer grind (still coarse, just smaller) |
| Steeping time too short | Steep for minimum 12 hours, ideally 18 hours |
| Old or stale beans | Buy fresh beans roasted within past month |
| Water temperature too cold | Try room temperature steeping instead of refrigerator |
The ratio issue causes most weak cold brew problems. If you used a 1:8 ratio expecting concentrate-level strength, you’ll end up disappointed. Recalculate your measurements and use more coffee or less water in your next batch. Measuring by weight instead of volume eliminates guesswork that leads to weak results.
Adding more coffee grounds per cup of water always strengthens your brew more effectively than extending steep time.
When your cold brew tastes bitter
Bitter cold brew results from over-extraction, where water pulls harsh compounds out of your coffee along with the good flavors. This happens less frequently than weak coffee but creates an equally disappointing drink. The bitterness coats your tongue and lingers unpleasantly long after you swallow.
Identify which extraction factor went wrong in your process:
| Problem | Solution |
|---|---|
| Grind too fine | Use coarser grind resembling sea salt |
| Steeping time too long | Reduce to 18 hours maximum |
| Water temperature too warm | Move to cooler location or refrigerator |
| Dark roast beans | Try medium roast for smoother flavor |
| Pressing or squeezing grounds | Let liquid drip naturally without force |
Fine grounds create the most common bitterness issues. If your coffee looks like sand or powder instead of coarse breadcrumbs, it’s ground too small for cold brew’s long steeping time. The excessive surface area extracts bitter compounds that destroy the smooth taste cold brew delivers when made correctly. Adjust your grinder to the coarsest setting or request a French press grind when buying pre-ground beans.
Steeping beyond 24 hours also guarantees bitterness regardless of your other variables. Write down your start time and set an alarm so you never accidentally over-steep your coffee. Even an extra 4-6 hours past the ideal window introduces harsh flavors that dilution can’t fix.
Extra tips and flavor variations
Your strong cold brew recipe becomes even more versatile when you understand how to enhance its flavor and avoid common pitfalls. Simple adjustments to your brewing technique and creative additions to your finished concentrate unlock new taste experiences without requiring additional equipment or complicated steps. These tips work whether you’re batch-prepping for the week or experimenting with single servings.
Making your process more efficient
Batch brewing saves significant time compared to making cold brew daily. Scale up your 1:4 ratio to brew larger quantities; try 400 grams coffee to 1600 grams water (roughly 1.7 quarts of concentrate) in a gallon-sized container. This batch lasts 7-10 days refrigerated and provides enough concentrate for multiple servings each day.
Coffee ice cubes prevent dilution problems entirely. Pour leftover concentrate into ice cube trays and freeze, then use these cubes in your drinks instead of regular ice. Each cube adds coffee flavor rather than watering down your carefully crafted brew as it melts.
Pre-portioning your beans into single-batch quantities speeds up your next brew session. Measure out the exact amount you need (100 grams for a small batch, 200 grams for a larger one) and store each portion in an airtight bag. This eliminates measuring during late-night brewing sessions and ensures consistent results every time.
Flavor additions that actually work
Cinnamon sticks infused during steeping create warm spice notes without added sugar. Add 2-3 whole cinnamon sticks directly to your grounds before pouring water, then remove them when straining. The subtle flavor enhances darker roasts particularly well.
Vanilla cold brew requires just 1/4 teaspoon pure vanilla extract per 8 ounces of diluted concentrate. Add it directly to your serving glass rather than the entire batch, letting you customize individual servings. Real vanilla extract works dramatically better than artificial flavoring.
Natural spices and extracts added sparingly complement your coffee’s existing flavors rather than masking them.
Chocolate variations benefit from unsweetened cocoa powder dissolved in a small amount of hot water first. Mix 1 teaspoon cocoa with 2 teaspoons hot water to create a paste, then stir this into your cold brew serving. This method prevents clumping that occurs when adding dry cocoa directly to cold liquid.
Maple cold brew combines 1-2 teaspoons pure maple syrup with your concentrate for a naturally sweet drink that needs no additional sugar. The maple flavor pairs especially well with medium roast beans that have caramel or nutty characteristics. Pour the syrup first, add concentrate, stir thoroughly, then add ice and any milk.
Wrap up and next steps
You now have everything you need to brew strong, smooth cold brew at home. The 1:4 coffee-to-water ratio, coarse grind size, and 18-hour steeping time give you a concentrated base that stays bold even after dilution. Master these fundamentals first, then experiment with different beans and flavor additions to find your perfect cup.
Quality beans make the biggest difference in your final result. Start your next batch with fresh-roasted Hawaiian Kona coffee for a strong cold brew recipe that showcases rich, smooth flavors without bitterness. Shop Menehune Coffee Company’s premium Kona Coffee to experience how exceptional beans transform your cold brew from good to cafe-quality. Their medium to dark roasts provide the bold body and low acidity that cold brewing enhances perfectly.